By: F09-B1 Since: Jun 2016 Licence: MIT
- 1. Introduction
- 2. Quick Start
- 3. Login Feature
- 4. Command Info
- 5. Help Feature
- 6. Contact Features
- 6.1. Adding a person:
add - 6.2. Locating persons by name or matriculation number:
find - 6.3. Listing all persons:
list - 6.4. Editing a person:
edit - 6.5. Sorting all entries:
sort - 6.6. Adding participation marks:
markPart - 6.7. Updating the display picture:
updateDP - 6.8. Deleting a person:
delete - 6.9. Selecting a person:
select
- 6.1. Adding a person:
- 7. Task, To-do list and Calendar Features
- 8. Miscellaneous Commands
- 9. Saving the data
- 10. Additional Information on Features
- 11. Frequently Asked Questions (FAQ)
- 12. Command Summary
1. Introduction
Your TA is for university Teaching Assistants (TAs) who prefer using a desktop application to manage student contacts and plan schedules.
Its features include a login system, tools to manage students' information, task schedulers linked to a calendar and many more!
It is optimized for those who prefer to work with a Command Line Interface (CLI) while still having the benefits of a Graphical User Interface (GUI).
This means if you prefer using the keyboard over the mouse and can type fast, it can get your contact management and scheduling done faster than traditional GUI applications.
This user guide will take you through the features and commands available for use.
2. Quick Start
Before you can use Your TA, follow these steps to set up the application and its necessary tools:
-
Ensure that you have Java version
1.8.0_60or later installed on your Computer.Having any Java 8 version is not enough.
This app will not work with earlier versions of Java 8. -
Download the latest
YourTA.jarhere. -
Copy the file to the folder you want to use as the home folder for your application.
-
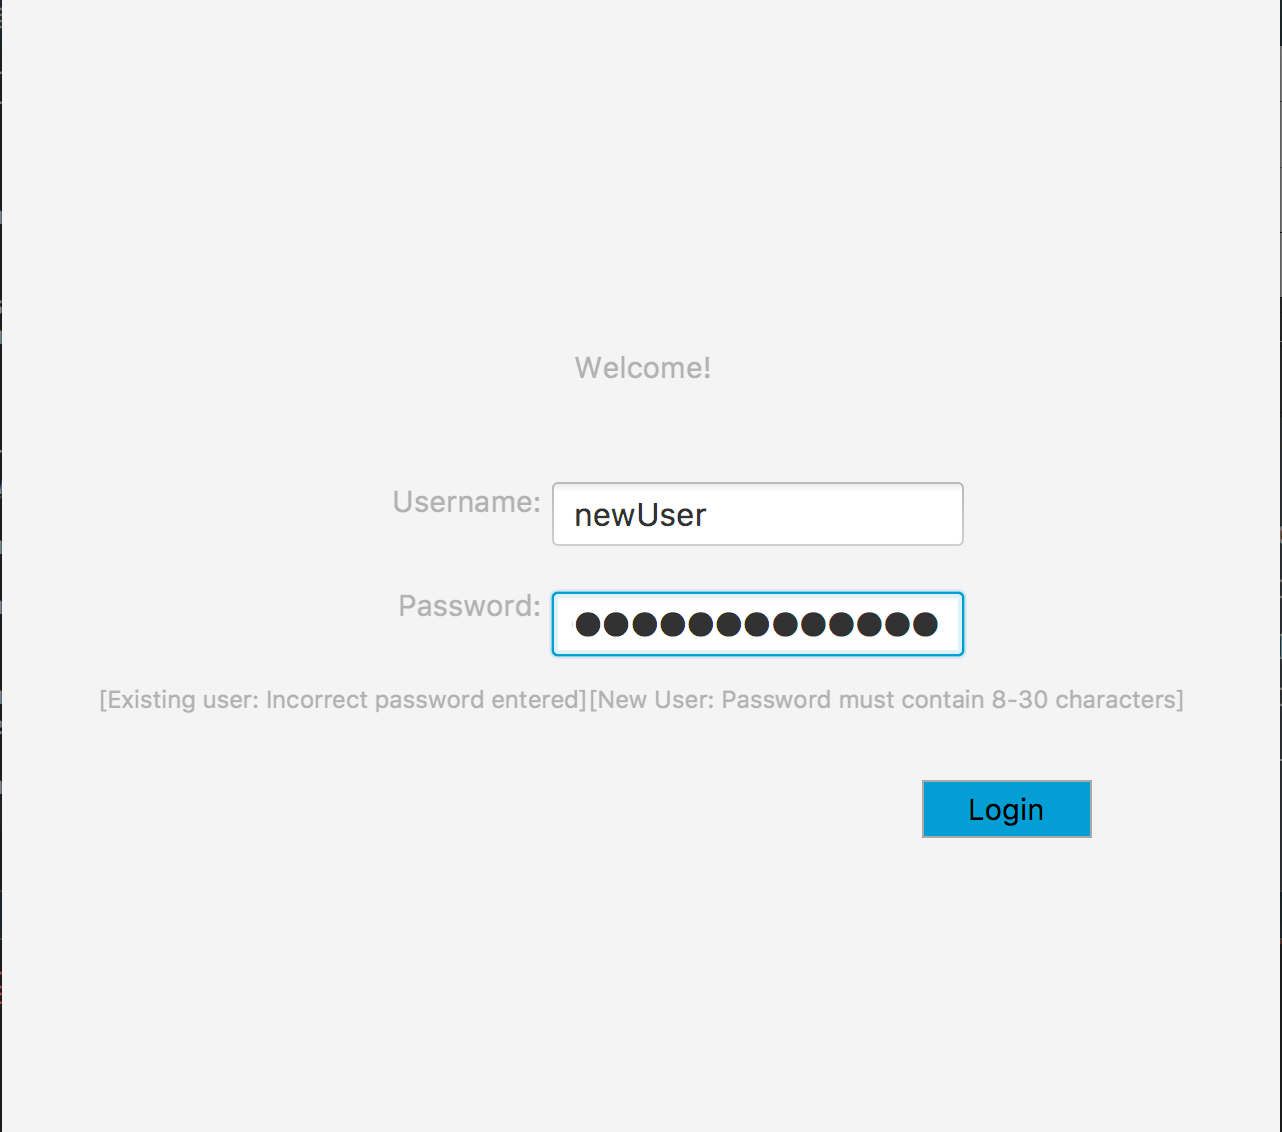
Double-click the file to start the application. The Login GUI should appear in a few seconds, as shown in Figure 1 below.
 Figure 1. Login GUI upon startup
 -
Enter your
UsernameandPasswordto log in. Refer to Section 3, “Login Feature” for details of the feature.If you’re a first-time user without an account, enter your desired UsernameandPasswordand an account will be created and you will be logged in automatically.
After logging in, you should now see the main Application GUI appear.
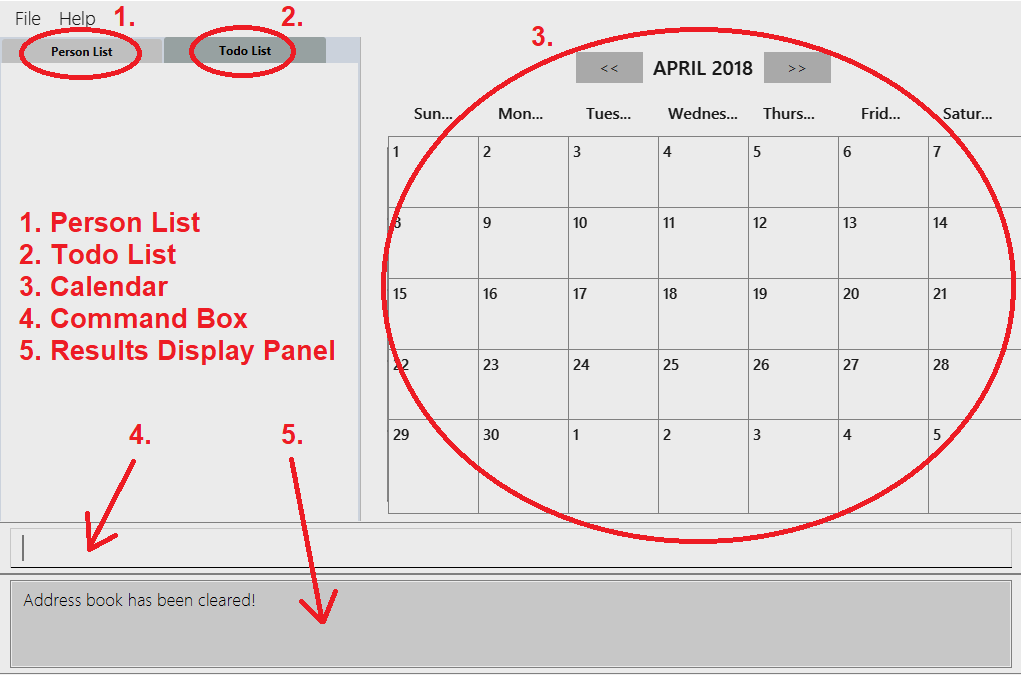
The key parts of the GUI (as shown in Figure 2 below) are:
-
Person List (displays all contacts)
-
Todo List (displays all outstanding tasks)
-
Calendar
-
Command Box (field where you input your commands)
-
Results Display Panel (field where results of commands appear)
Tips on using the command box:
-
The command box is where you type in commands followed by pressing Enter to execute it.
For instance, typinghelpand pressing Enter will open the help window for the application. -
Some example commands you can try:
-
list: lists all contacts. -
addn/John Doem/A0167352Fp/98765432e/johnd@example.coma/John street, block 123, #01-01: addsJohn Doeas a contact with their respective details. -
delete3: deletes the 3rd contact shown in the current list. -
exit: exits the application.
-
-
Refer to Section 6, “Contact Features” and Section 7, “Task, To-do list and Calendar Features” for details of each command.
3. Login Feature
Before you are able to access the application, login is required.
-
Enter your
UsernameandPasswordin the respective fields. -
Click on the
loginbutton. -
If you have entered either of those incorrectly, the text "[Existing user: Incorrect password entered] [New User: Password must contain 8-30 characters]" will be displayed.
This means that if you are an existing user (i.e. have logged in before), you have entered your password incorrectly, and if you are a new user, your password does not meet the specified requirements for a creation of a password. You have an unlimited number of tries to log in. -
Upon successful login, the application will load with your previously (if applicable) saved data.
| When creating a username and password, they need to be alphanumeric (contain only numbers and alphabets). |
Both Username and Password fields are case-sensitive.
|
If you are a first-time user, create an account by entering your desired Username and Password in the username and password text fields respectively.Then, press ENTER or click Login.
|
Example:
Say you want to create an account with the following credentials.
Username: newUser
Password: Iamanewuser
Upon typing in the credentials, a new instance of Your TA will start up as seen in Figure 3 below.

If you log out then log back in with the same username (newUser) but an incorrect password (Iamnotanewuser, for instance), an error message will be displayed as seen in Figure 4 below.
4. Command Info
These are the guidelines on how the command format will be represented in the rest of this guide.
Command Format
-
Commands have aliases, which are either shorter versions of the commands or their equivalent symbols.
e.g.addn/John Doe, 'a`n/John Doeor+n/John Doeall result in John Doe being added as a contact, where "add" is the command itself, and "a" and "+" are its aliases. -
Words in
UPPER_CASEare the parameters to be supplied by the user.
e.g. inaddn/NAME,NAMEis a parameter which can be used asaddn/John Doe. -
Items in square brackets are optional.
e.g.n/NAME [t/TAG]can be used asn/John Doe t/friendor asn/John Doe. -
Items with
… after them can be used multiple times (including zero).
e.g.[t/TAG]…can be used ast/friend,t/friendt/family, or even not used at all. -
Parameters can be in any order e.g. if the command specifies
n/NAMEp/PHONE_NUMBER,p/PHONE_NUMBERn/NAMEis also acceptable.
5. Help Feature
This guide can be opened in Your TA itself, with the use of the help command.
Viewing help : help
Alias: ?
Format: help
| This opens a help window which explains what commands can be used, and how to use them. |
6. Contact Features
This section shows an in-depth explanation of the commands available to be used on entries found in the Person List.
6.1. Adding a person: add
Adds a person (student) into the person list.
Alias: a and +
Format: add n/NAME m/MATRICULATION NUMBER p/PHONE_NUMBER e/EMAIL a/ADDRESS dp/[IMAGE PATH] [t/TAG]…
| Both the display picture and tags fields are optional, and a person can have any number of tags (including zero). |
| The tags "lecturer", "TA" "student" and "T1" will appear red, yellow, blue and green respectively. |
| Do refrain from using high resolution images as display pictures, the optimum resolution is 500 x 500 pixels. |
|
The name field of Your TA will allow duplicate names to be stored (but not duplicate people, where all fields are the same). However, the matriculation number field does not allow duplicates. |
Examples:
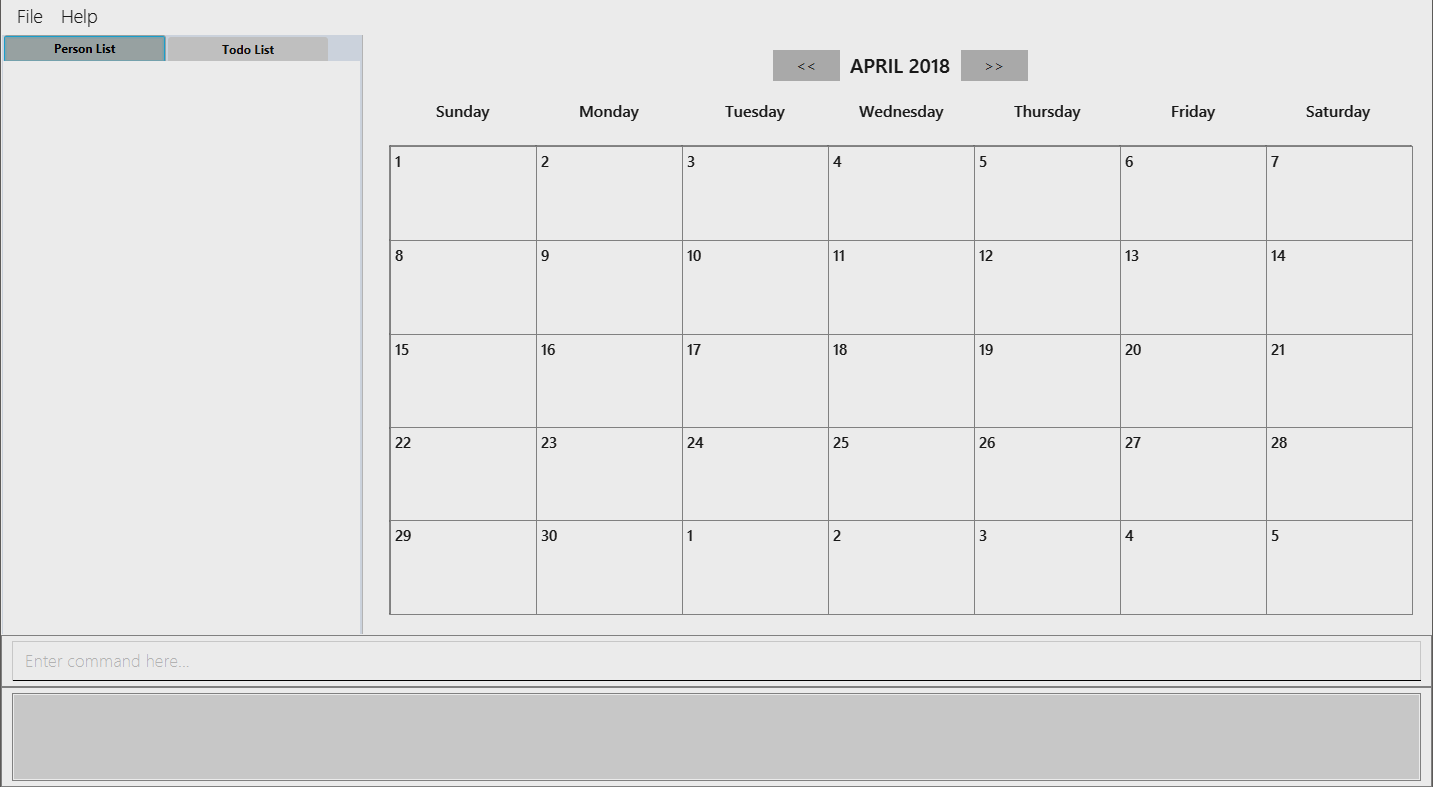
The application initially starts with default inputs as displayed in Figure 5 below.
Let’s try entering a command.
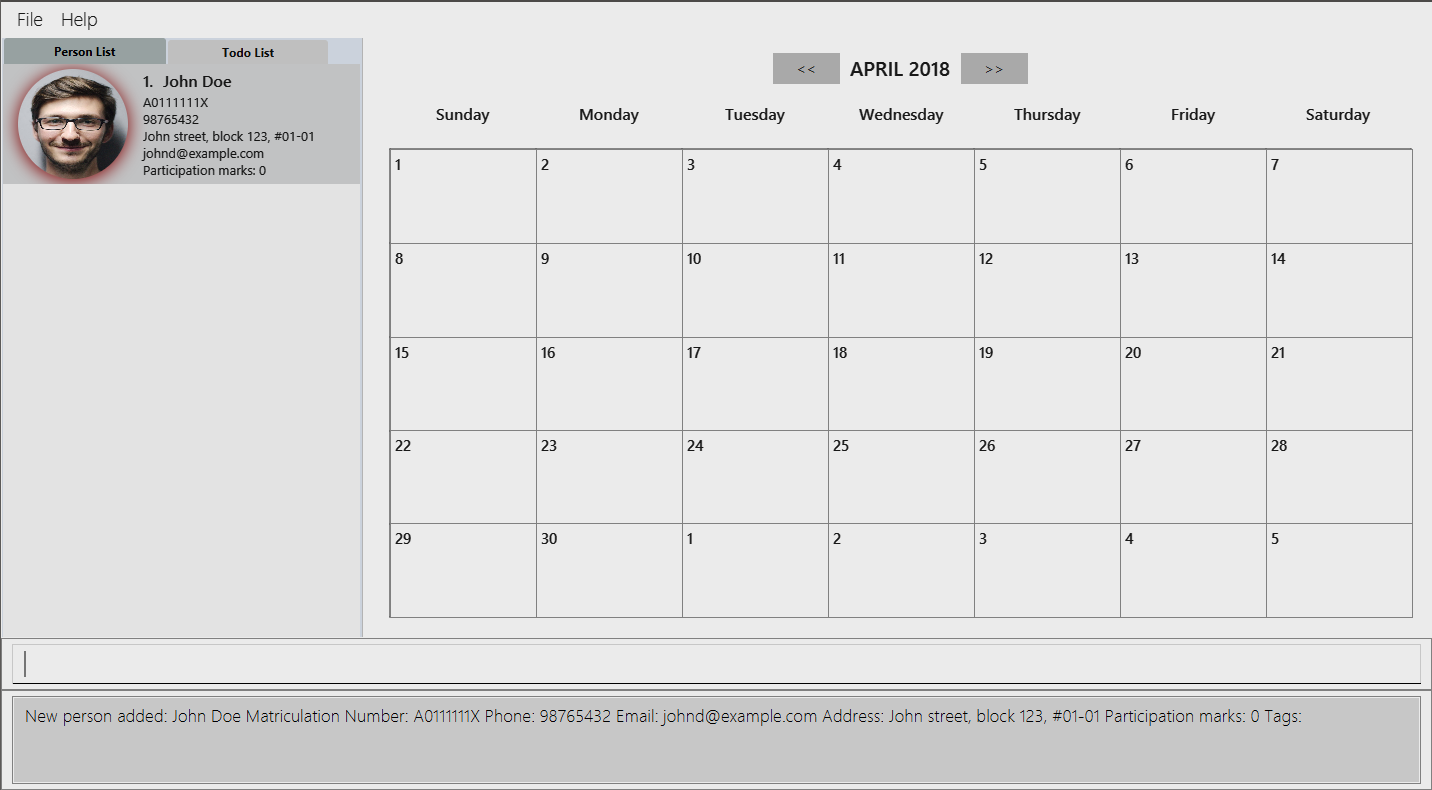
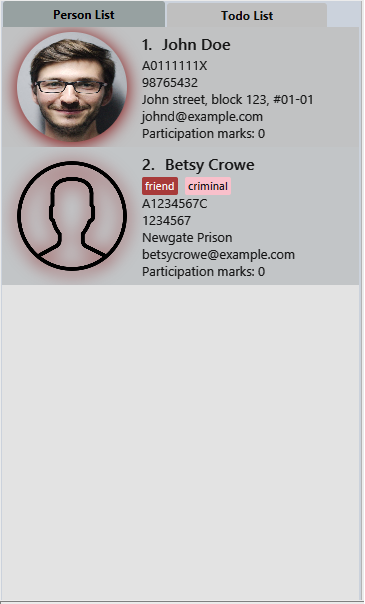
Command entered: add n/John Doe m/A0111111X p/98765432 e/johnd@example.com a/John street, block 123, #01-01 dp/C:\Users\Name\Desktop\John.jpg
The filepath after the dp/ depends on where your image file is located.
|
Result: This will add 'John Doe' into the person list with his respective details (as seen in Figure 6).
Let’s try another command.
Command entered: add n/Betsy Crowe t/friend m/A1234567C e/betsycrowe@example.com a/Newgate Prison p/1234567 t/criminal
Result: This will add 'Betsy Crowe' into the person list with her respective details (as seen in Figure 7).
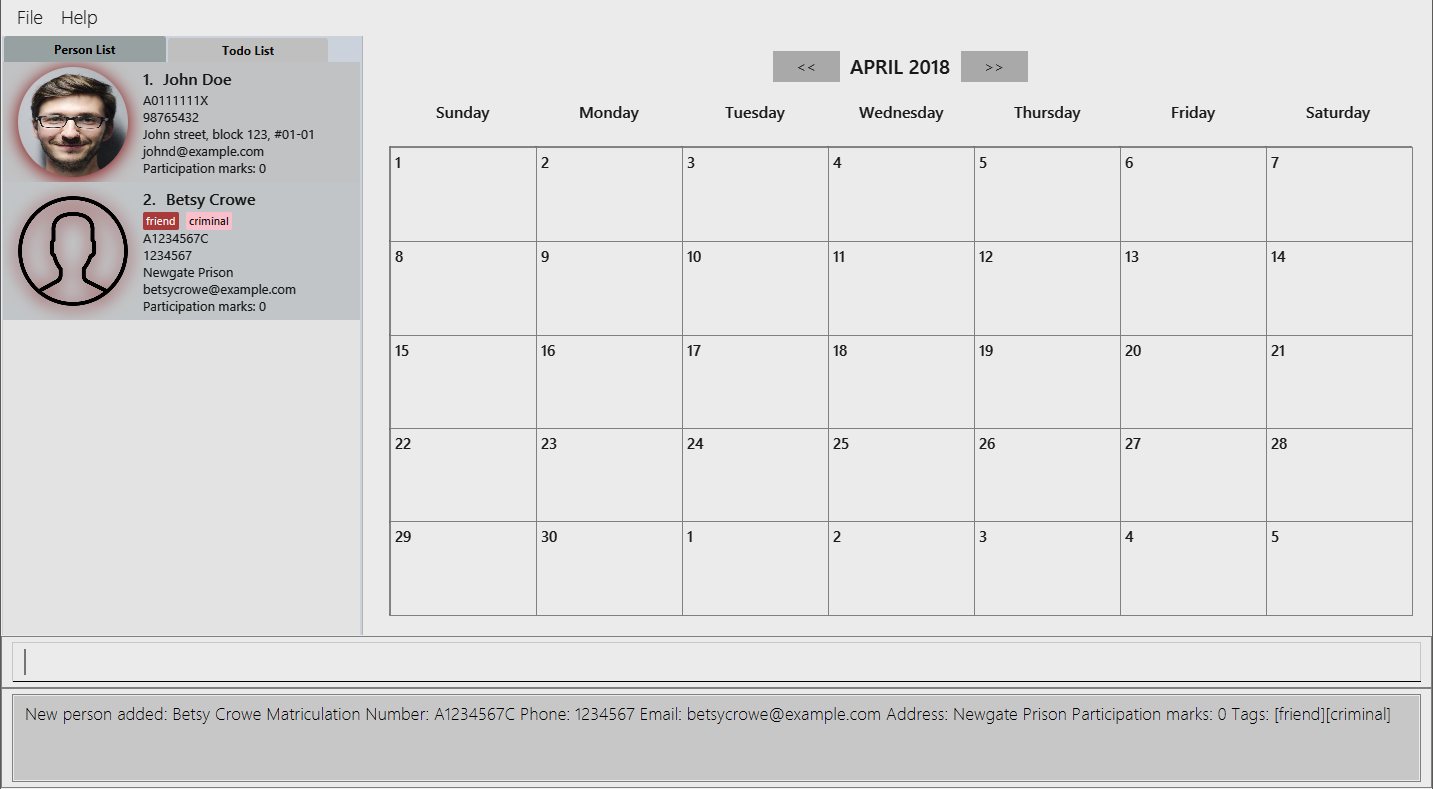
You may leave the dp/ portion empty if you do not have a profile picture. The application will default to using the default profile picture.
|
6.2. Locating persons by name or matriculation number: find
Finds students whose names contain any of the given keywords or whose matriculation number corresponds to the given keyword and lists them as results.
Alias: f
Format: find KEYWORD [MORE_KEYWORDS]…
Examples:
The application starts with the following as shown in Figure 8 below.

Let’s say you’re looking for a person with the name 'John'.
Command entered: find John
Result: The application searches for the keyword 'John' and returns 1 result (see Figure 9).
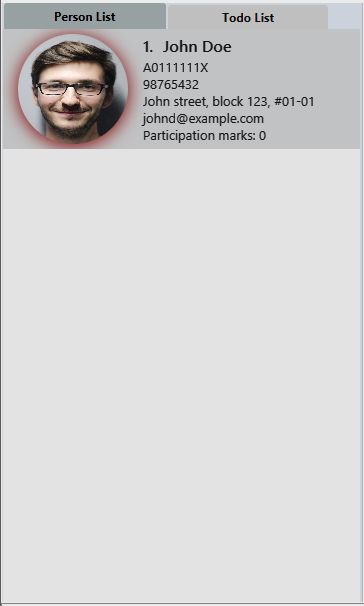
The next command shows how to search using multiple keywords.
Command entered: find Betsy Tim John
Result: The application searches for the keywords 'Betsy', 'Tim' and 'John' and returns 2 results (see Figure 10).
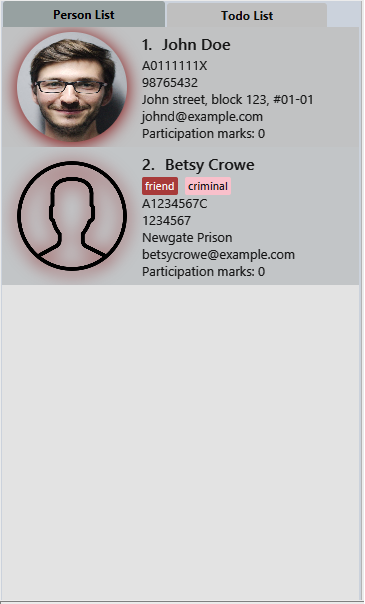
The next command shows how to search using matriculation number.
Command entered: find A0111111X
Result: The application searches for the person with the matriculation number as shown and returns 1 result (see Figure 11).
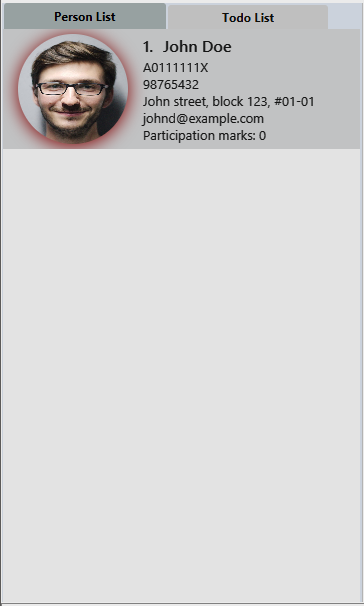
6.3. Listing all persons: list
Displays a list of all persons in the application.
Alias: ls
Format: list
Example:
Command entered: list
Result: Application lists all persons who have been added up until this point (see Figure 12).
6.4. Editing a person: edit
Edits an existing person (has already been added) in the application.
Alias: e
Format: edit INDEX [n/NAME] [m/MATRICULATION NUMBER] [p/PHONE] [e/EMAIL] [a/ADDRESS] [dp/IMAGE PATH] [t/TAG]…
| Do refrain from using high resolution images as display pictures, the optimum resolution is 500 x 500 pixels. |
Examples:
Address book starts with the following as shown in Figure 13 below.

Say you wish to edit the details of 'Betsy Crowe'.
Command entered: edit 2 p/91234567 e/johndoe@example.com dp/C:\Users\Name\Desktop\betsy.jpg
Result: This changes the details of the person with index 2 (Betsy Crowe) and writes over her original saved details (Figure 14).

If you find that you’ve added someone with incorrect details, you can change the entry.
Command entered: edit 1 n/John Doeser
Result: This changes the details of the person with index 1 (originally John Doe) and updates his details (see Figure 15).

6.5. Sorting all entries: sort
Sorts all entries found in the person list in alphabetical order based on name.
Alias: s
Format: sort
6.6. Adding participation marks: markPart
Adds to the participation marks of a person (student). The maximum limit for participation marks is 100
and the maximum amount that can be added per execution of the command is 100.
i.e. if someone has 90 marks and you add 20, the participation marks will be capped at 100.
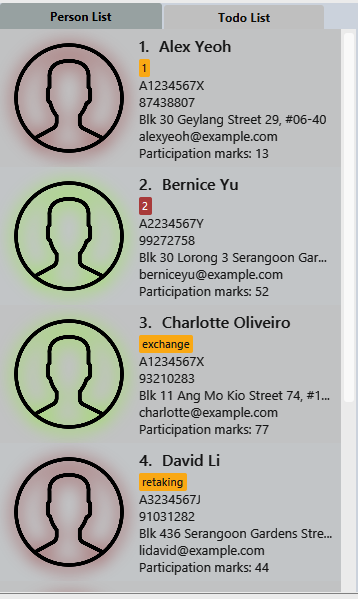
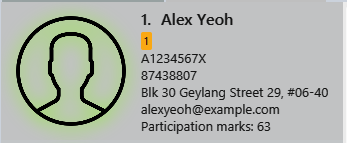
If the marks are below 50, there will be a red frame surrounding the person’s profile picture. If the person has 50 or more marks, the colored frame around the user will change to green.
Format: markPart INDEX marks/DIGITS
Examples:
Command entered: list
Result: Lists all people in the application (see Figure 16).
Command entered: markPart 1 marks/50
Result: Adds 50 participation marks to the 1st person in Your TA (see Figure 17).
Command entered: find David
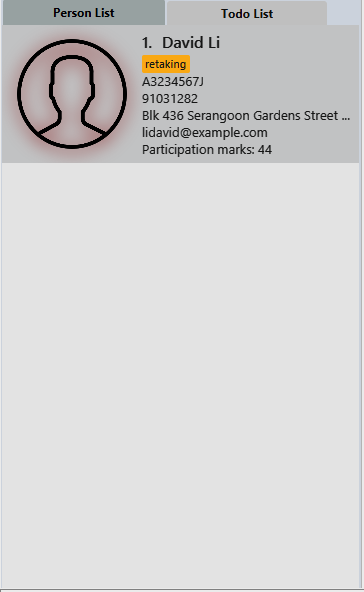
Result: Returns David as a result (see Figure 18).
find Command returns DavidCommand entered: markPart 1 marks/70
Result: Adds 70 marks to the 1st person in the results of the find command, in this case, David.
Note that it has exceeded the cap of 100, hence the marks was set to 100 (see Figure 19).

6.7. Updating the display picture: updateDP
Updates a person’s display picture in the application.
Format: updateDP INDEX dp/[IMAGE PATH]
| Do refrain from using high resolution images as display pictures, the optimum resolution is 500 x 500 pixels. |
Examples:
Command entered: list
Result: Lists all people in Your TA (see Figure 20).
We can see that Alex Yeoh has a display picture.
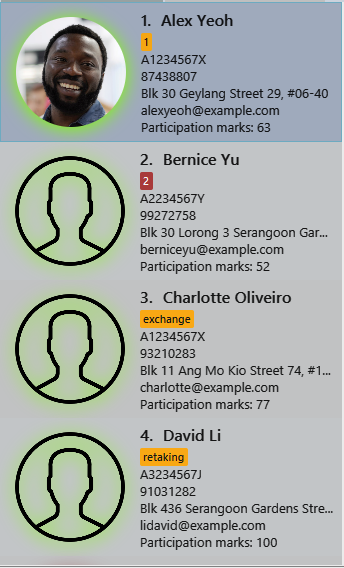
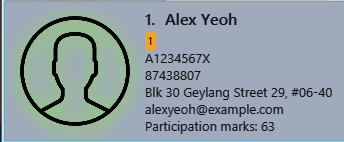
Command entered: updateDP 1 dp/
Result: Deletes the display picture of the 1st person, returning it back to the default profile picture (see Figure 21).
Command(s) entered: find Betsy, updateDP 1 dp/C:\Users\Betsy\Desktop\betsy.jpg
Result: Returns Betsy as a result and updates the display picture of the 1st person, in this case Betsy, to the picture specified in the dp/ field.
6.8. Deleting a person: delete
Deletes the specified person from the address book.
Alias: d and -
Format: delete INDEX
| The display picture that is stored on your hard disk will only be removed upon the next start up of Your TA when you log into the same account that created it. |
Examples:
Address book starts with the following as shown in Figure 22 below.
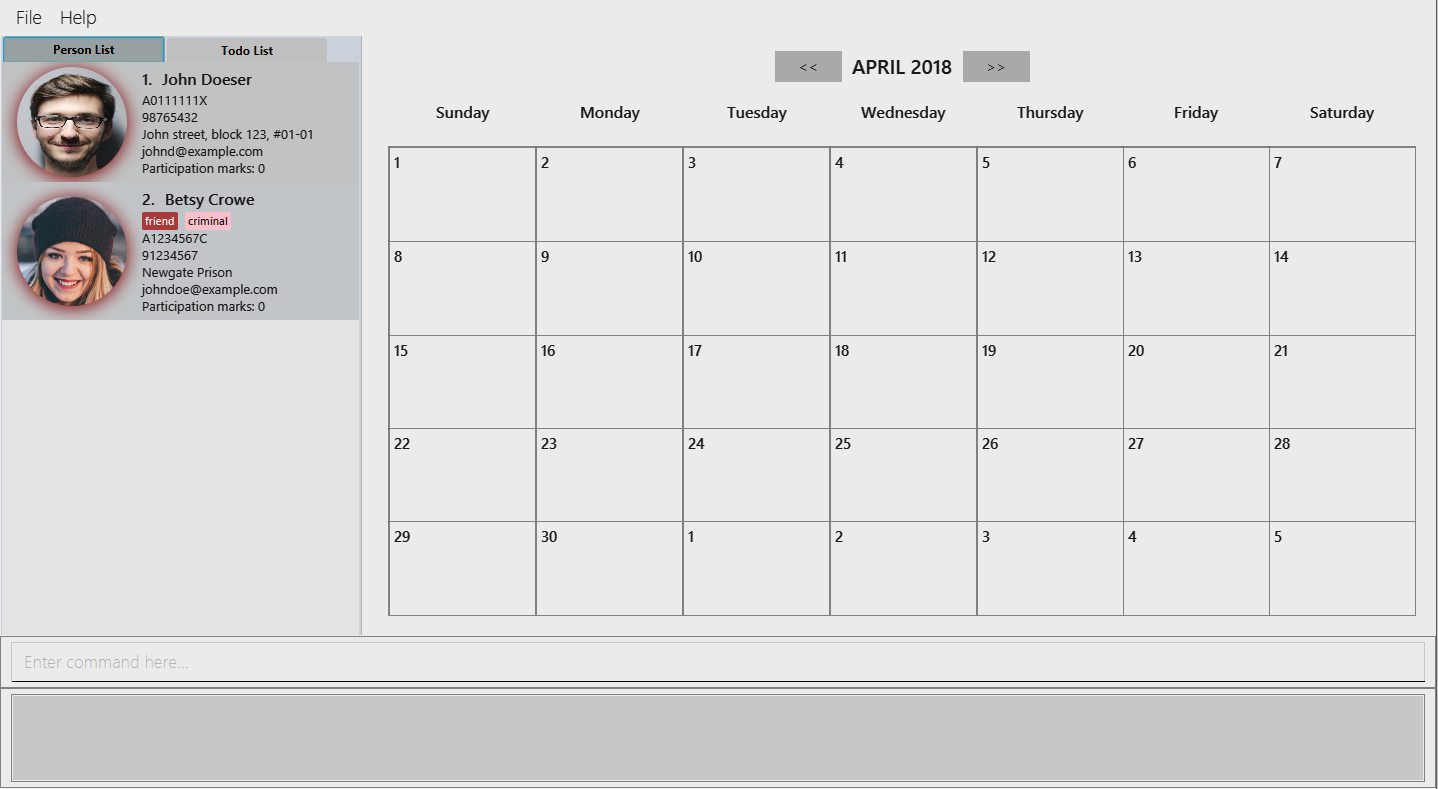
Command(s) entered: list, delete 2
Result: The 2nd person listed in the address book is deleted (see Figure 23).
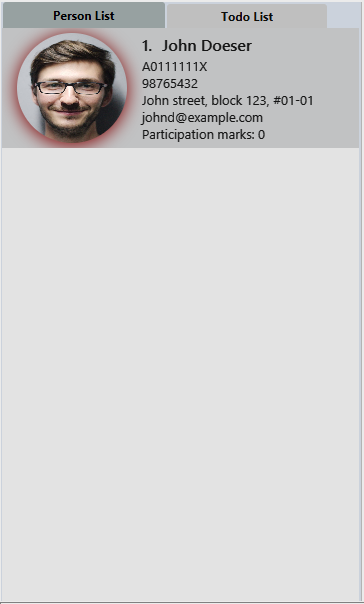
Command(s) entered: find John, delete 1
Result: The 1st person listed in the person list, in this case, John is deleted (see Figure 24).
6.9. Selecting a person: select
Selects the person identified by the index number used in the last person listing.
Alias: s
Format: select INDEX
Examples:
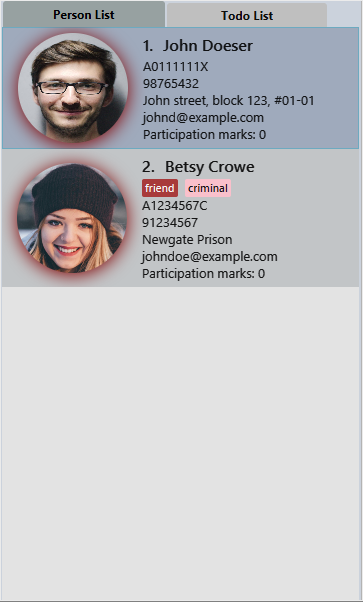
Your TA starts with the following as shown in Figure 25 below.

Command(s) entered: list, select 1
Result: Lists all people in address book and selects the 1st person (see Figure 26).
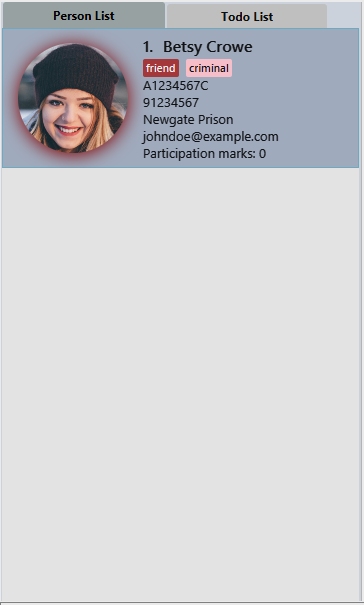
Command(s) entered: find Betsy, select 1
Result: The 1st person in the results of the find command is selected, in this case, Betsy is selected (see Figure 27).
7. Task, To-do list and Calendar Features
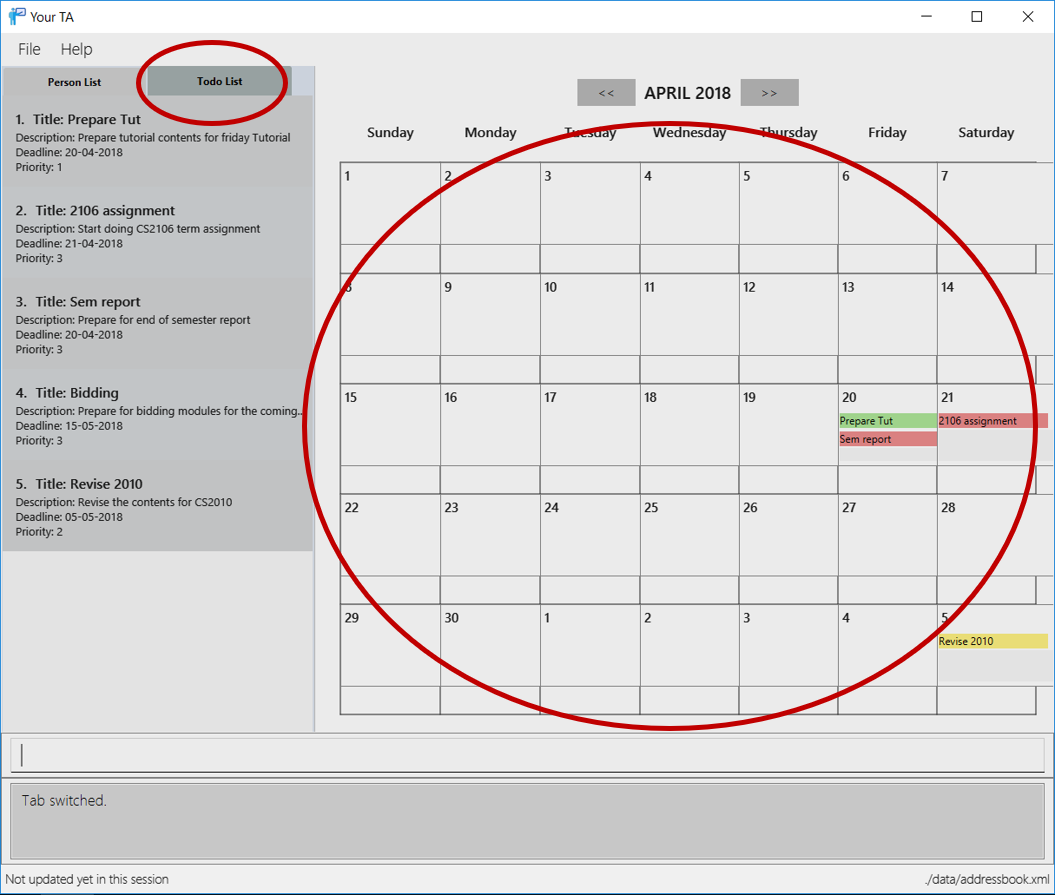
To see how the task scheduling feature works on the Todo List and Calendar, select the Todo List tab located right beside the Person List tab.
Figure 28 below shows where the Todo List and Calendar are located
7.1. Switching between tabs: switchTab
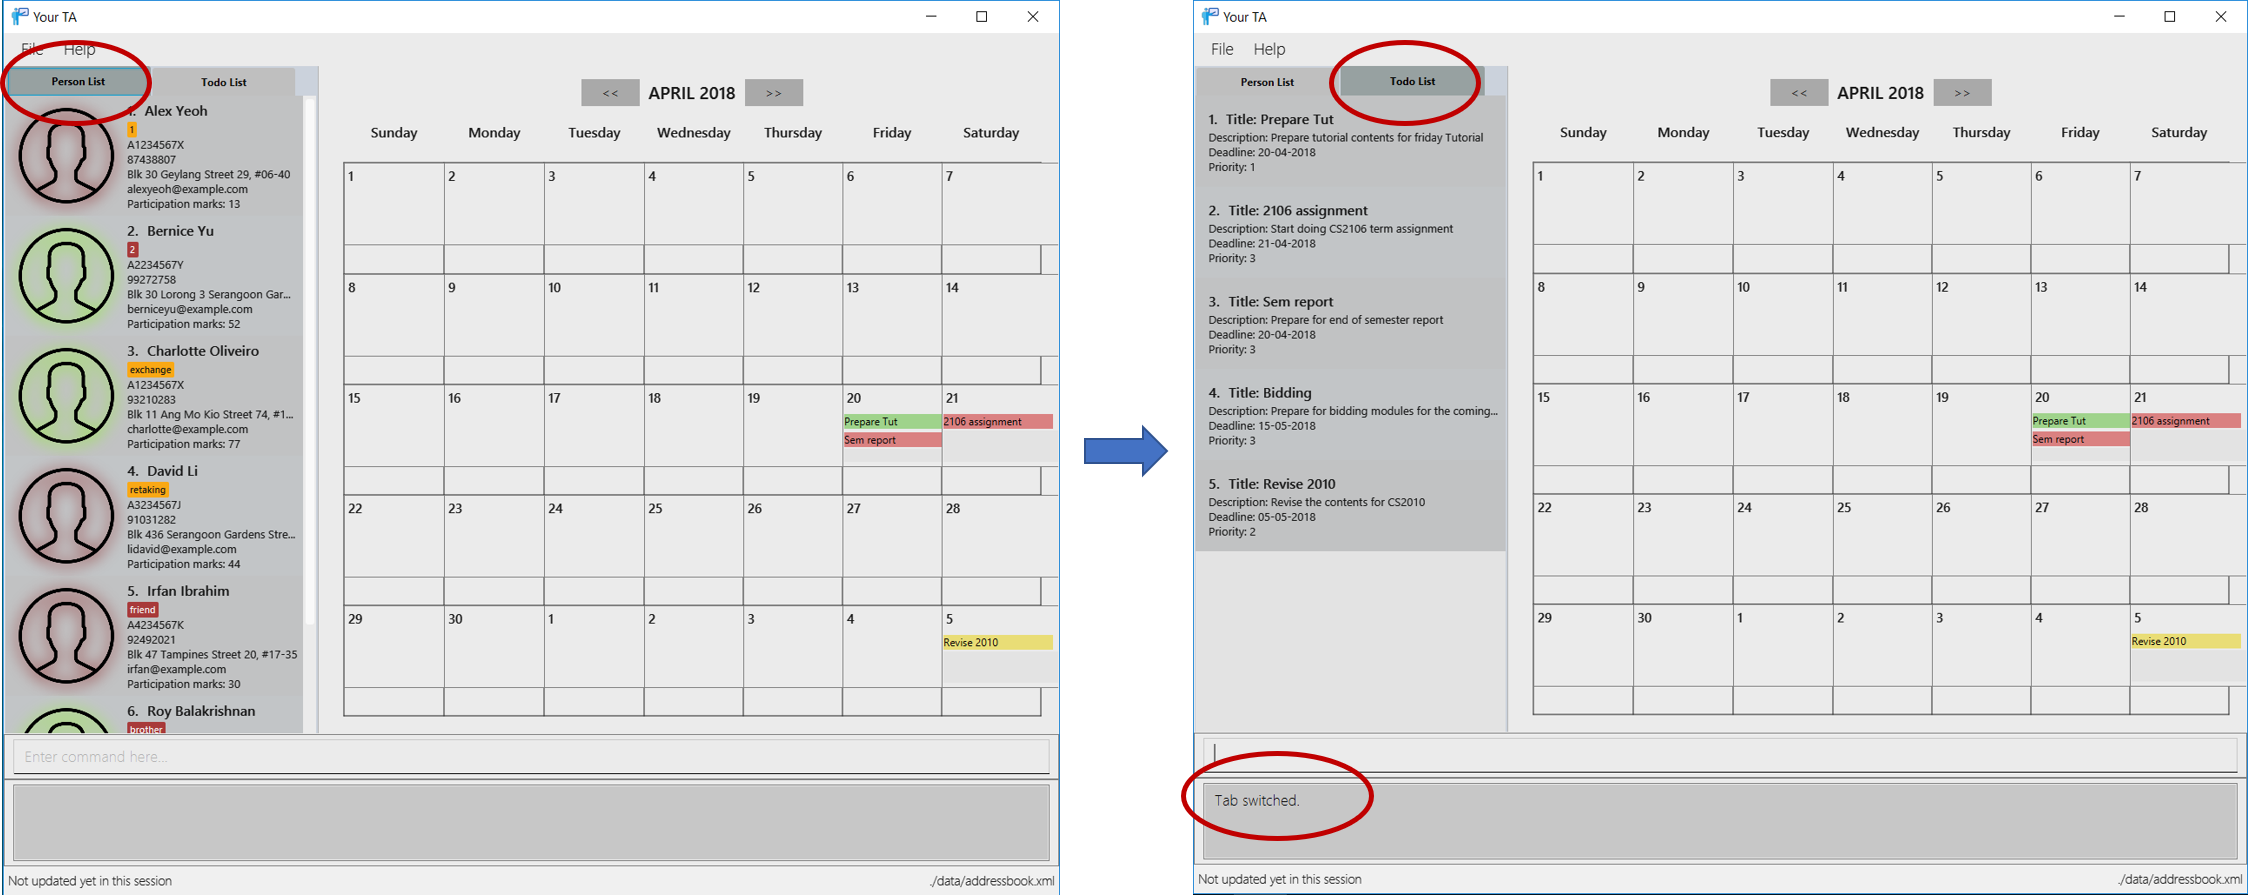
Switches between the Person List tab and Todo List tab.
Alias: swt
Format: switchTab
Figure 29 below shows the result of entering command switchTab switching from Person List to Todo List and the display of command result.
7.2. Adding a task: addTask
Adds a task to the address book.
Alias: at
Format: addTask title/TITLE desc/TASK DESCRIPTION by/DEADLINE priority/PRIORITY
New tasks will be added into the To-do list and Calendar.
DEADLINE must be in the format of DD-MM-YYYY, and has to be a date that exists.
|
| The month value has to be a month no more than 6 months after the current month (Start counting to 6 from the next month). |
| Tasks do not need to be unique, duplicate tasks are allowed. |
Examples:
Current date: 15-04-2018
The application initially starts with no tasks, as seen in Figure 30 below.

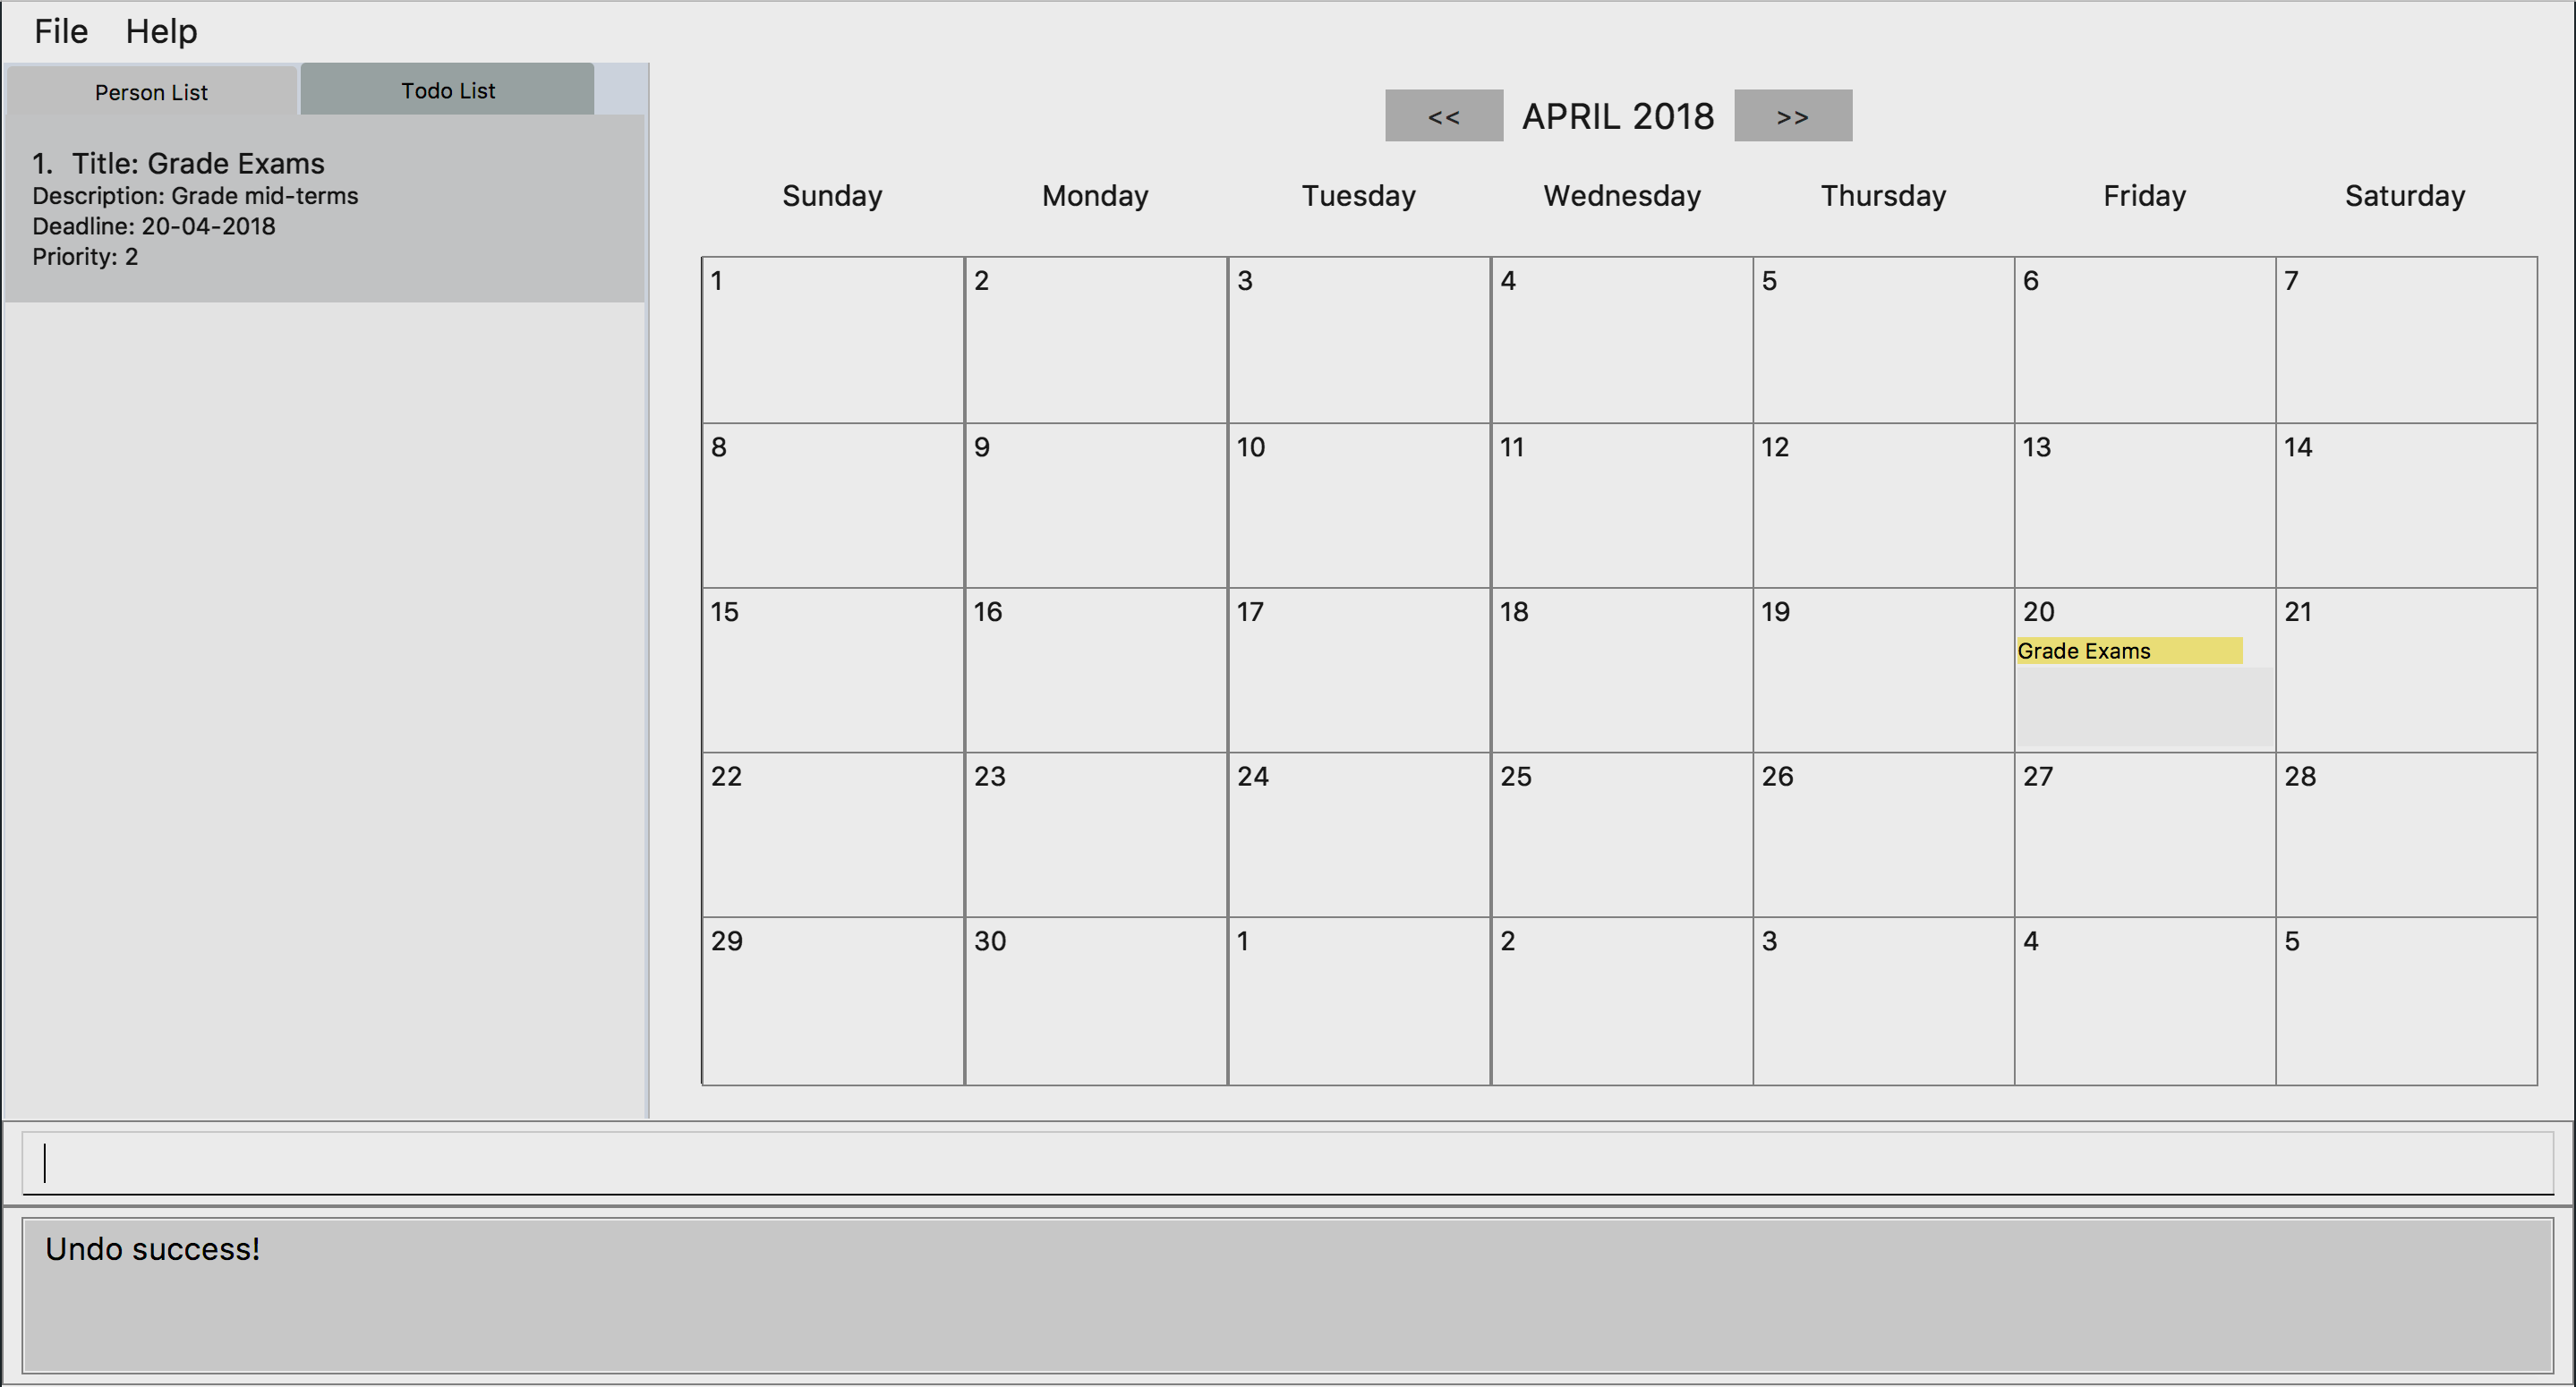
Command entered: addTask title/Grade Exams desc/Grade mid-terms by/20-04-2018 priority/2
Result: This will add a task, 'Grade mid-terms' into the todo list with the respective details (see Figure 31).
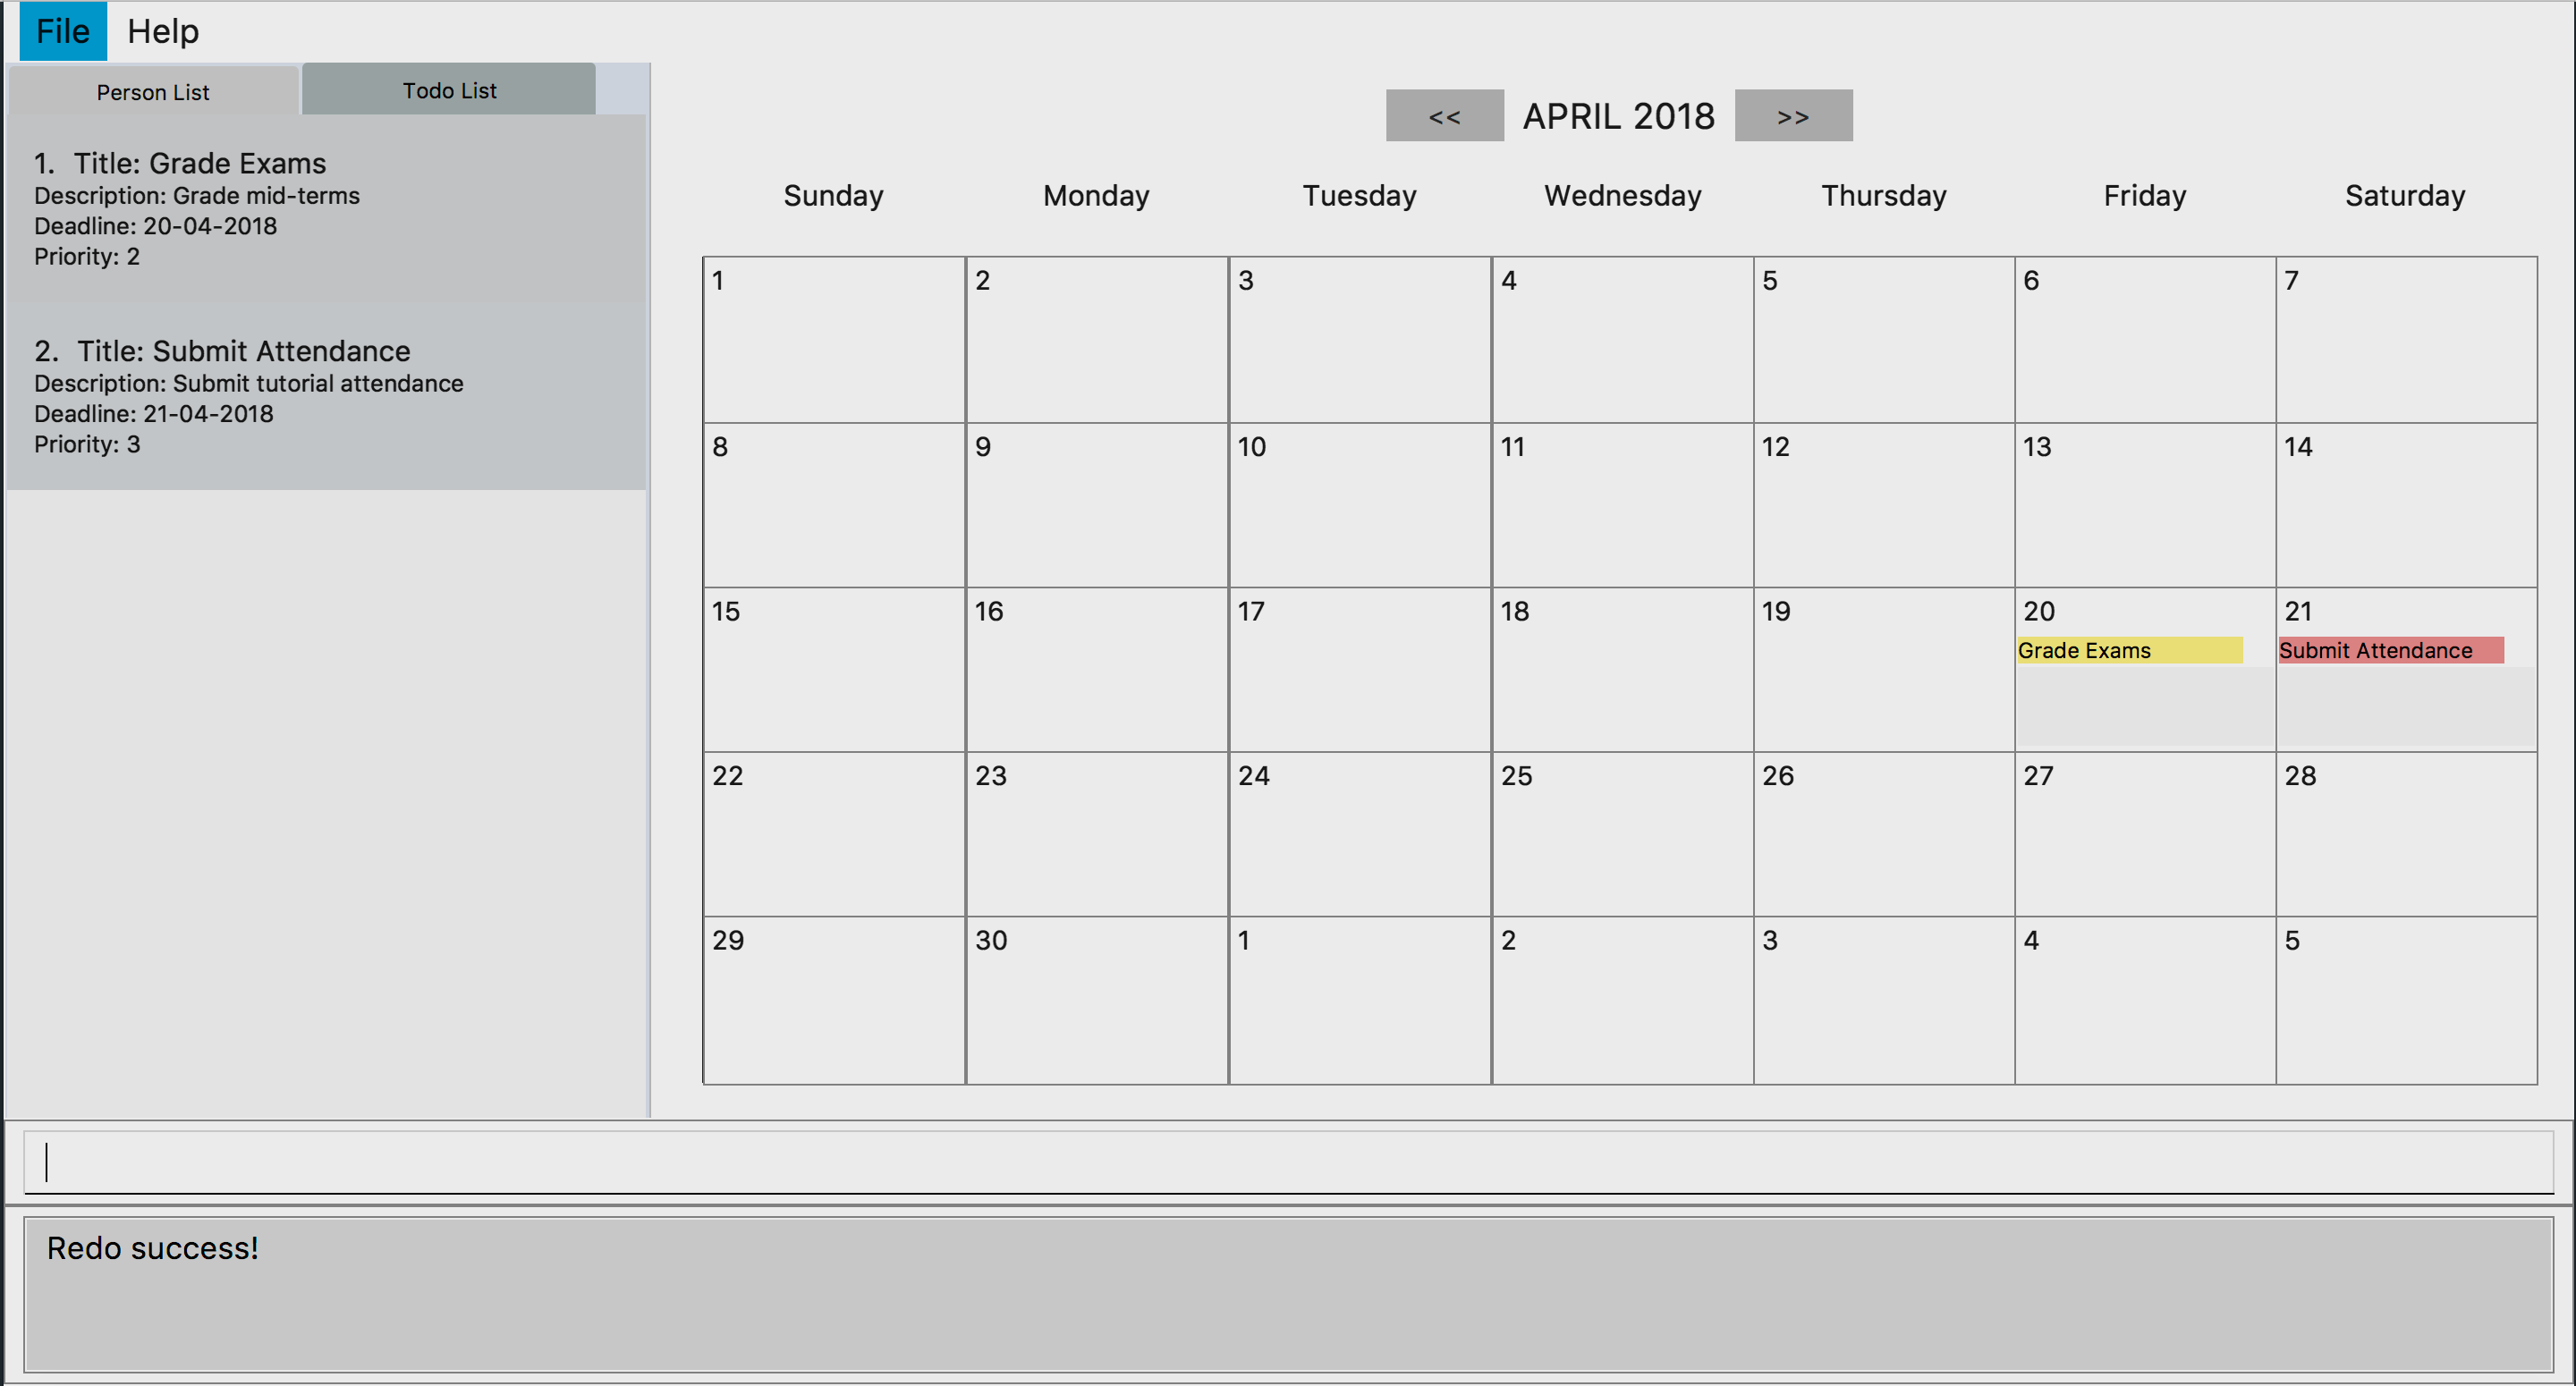
Command entered: addTask title/Submit Attendance desc/Submit tutorial attendance by/21-04-2018 priority/3
Result: This will add a task, 'Submit tutorial attendance' into the calendar and todo list with the respective details into the application (see Figure 32).
7.3. Editing a task: editTask
Edits a task in the todo list.
Alias: et
Format: editTask INDEX [title/TASK TITLE] [desc/TASK DESCRIPTION] [by/DEADLINE] [priority/PRIORITY]
|
Not all fields are required, you may only pick the fields that you want to edit. |
The specified tasks will be edited in the Todo List and Calendar.
Examples:
Current date: 15-04-2018
The application initially starts with 2 tasks (see Figure 33).

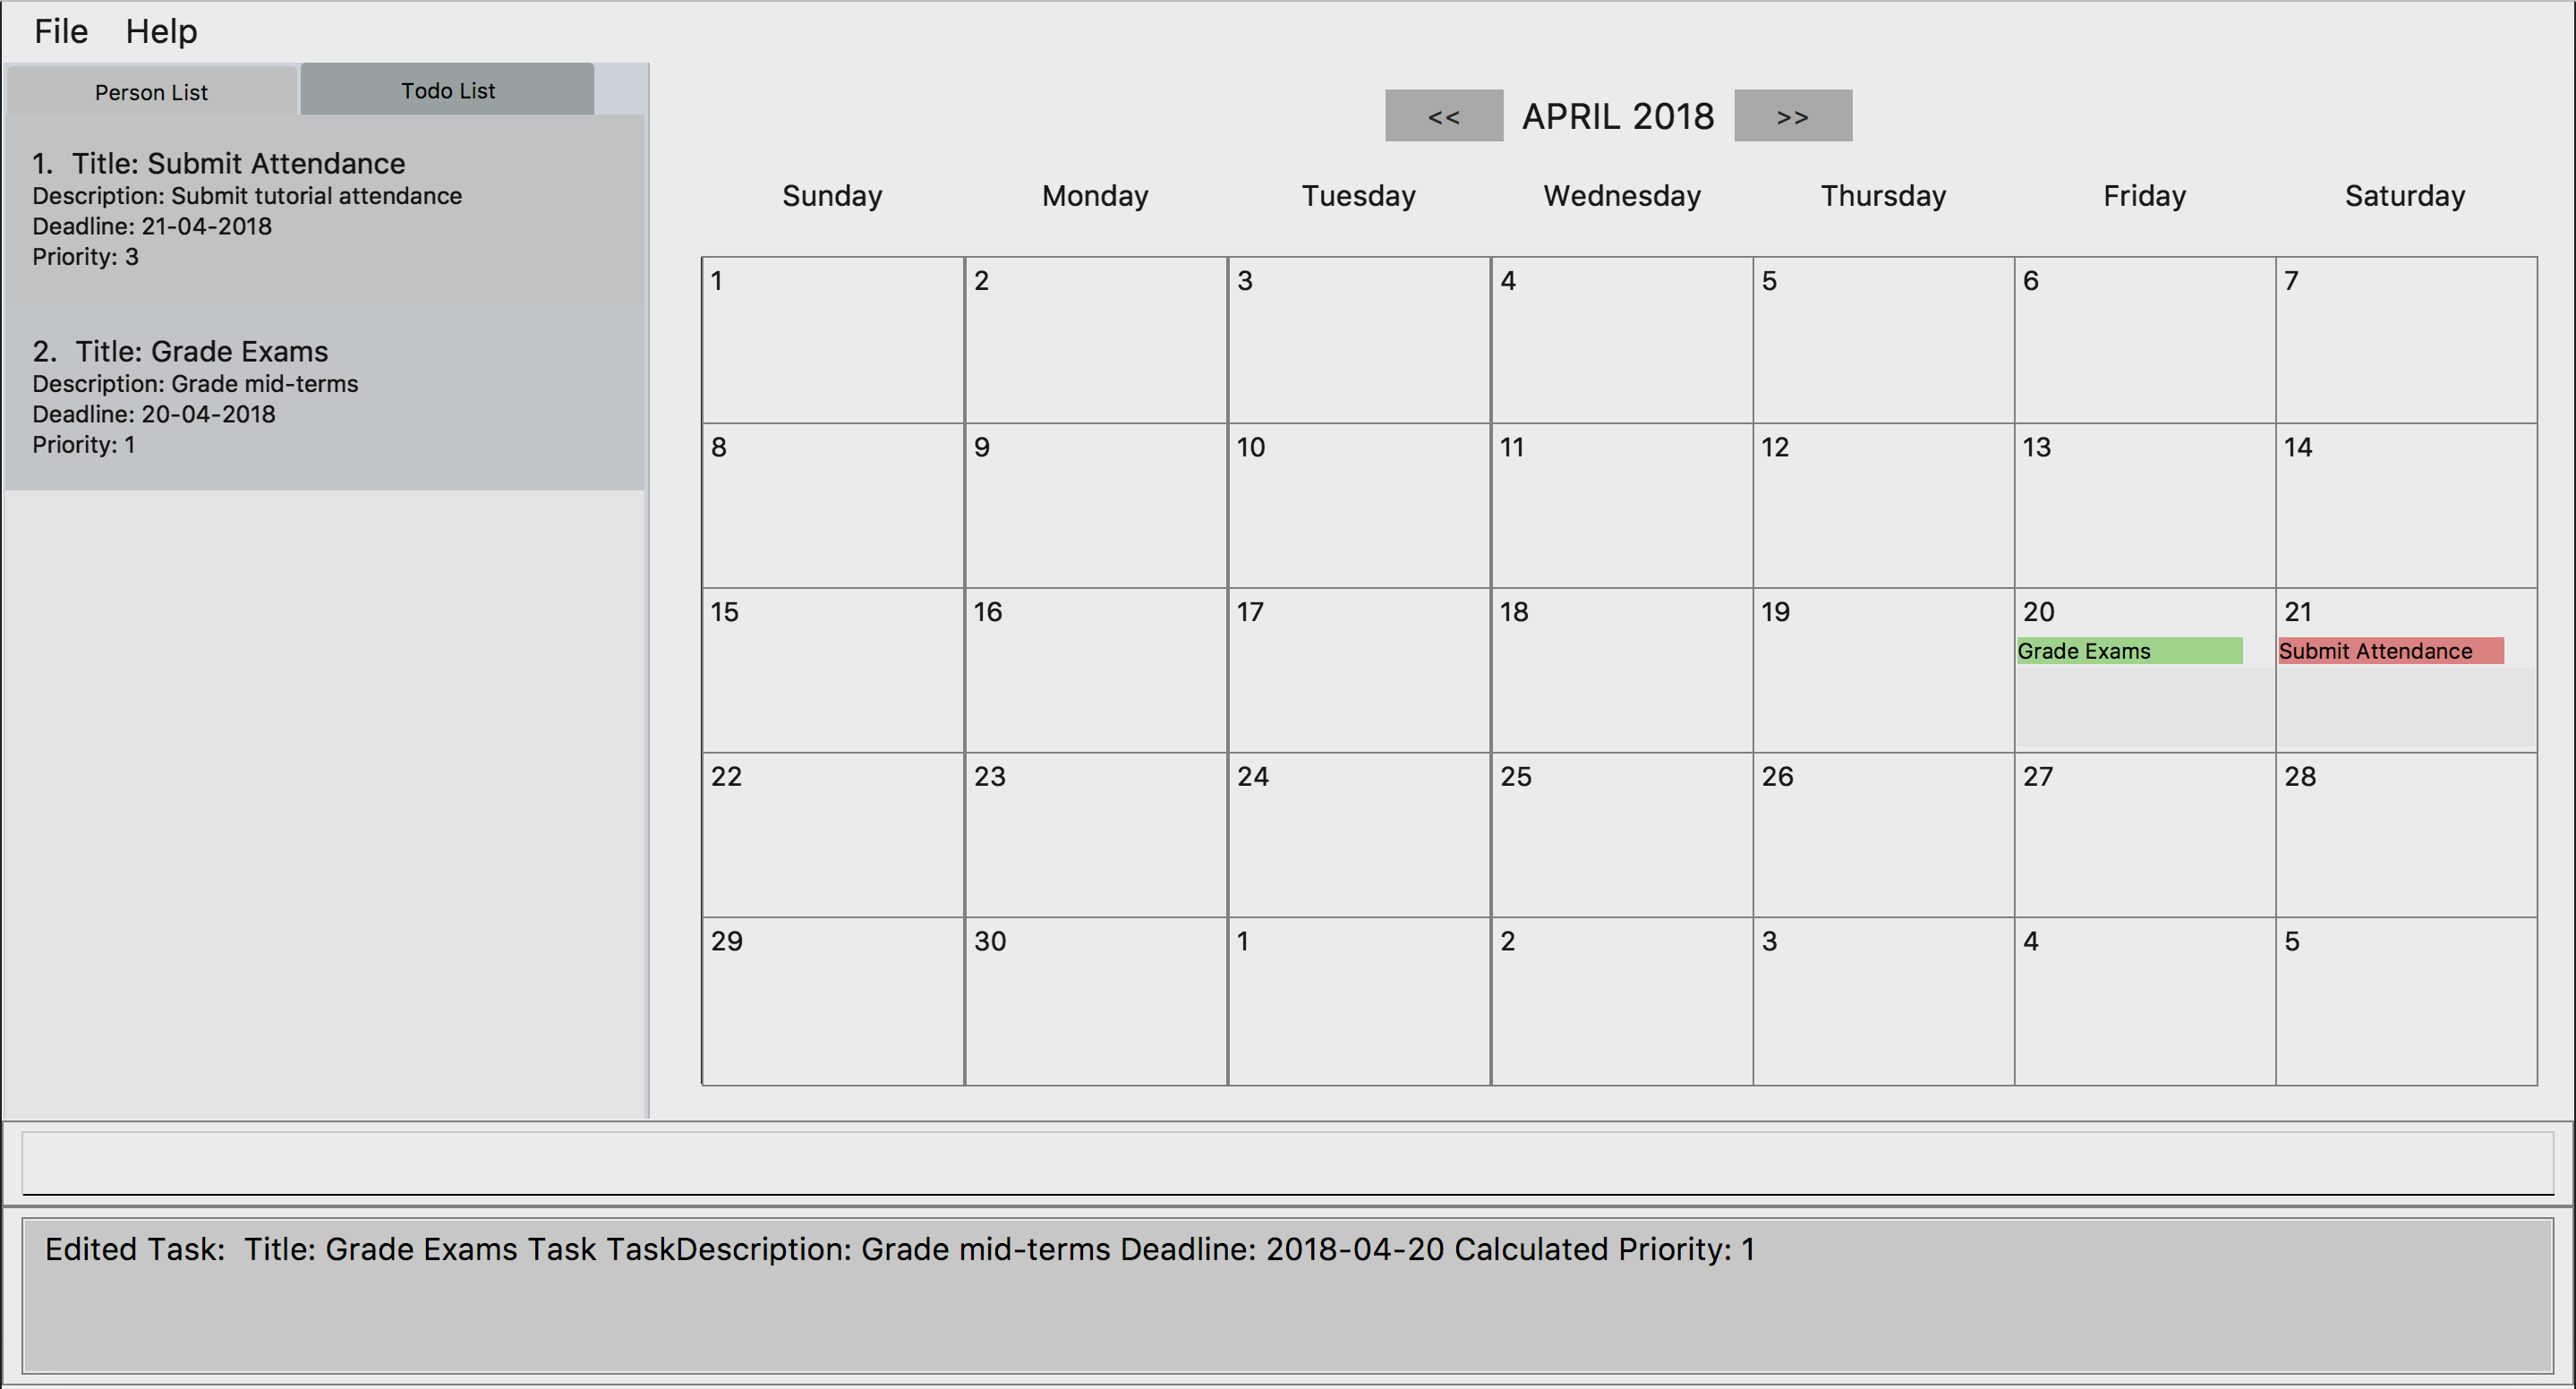
Command entered: editTask 1 priority/1
Result: This edits the task at index 1, and change its priority to 1 (see Figure 34).
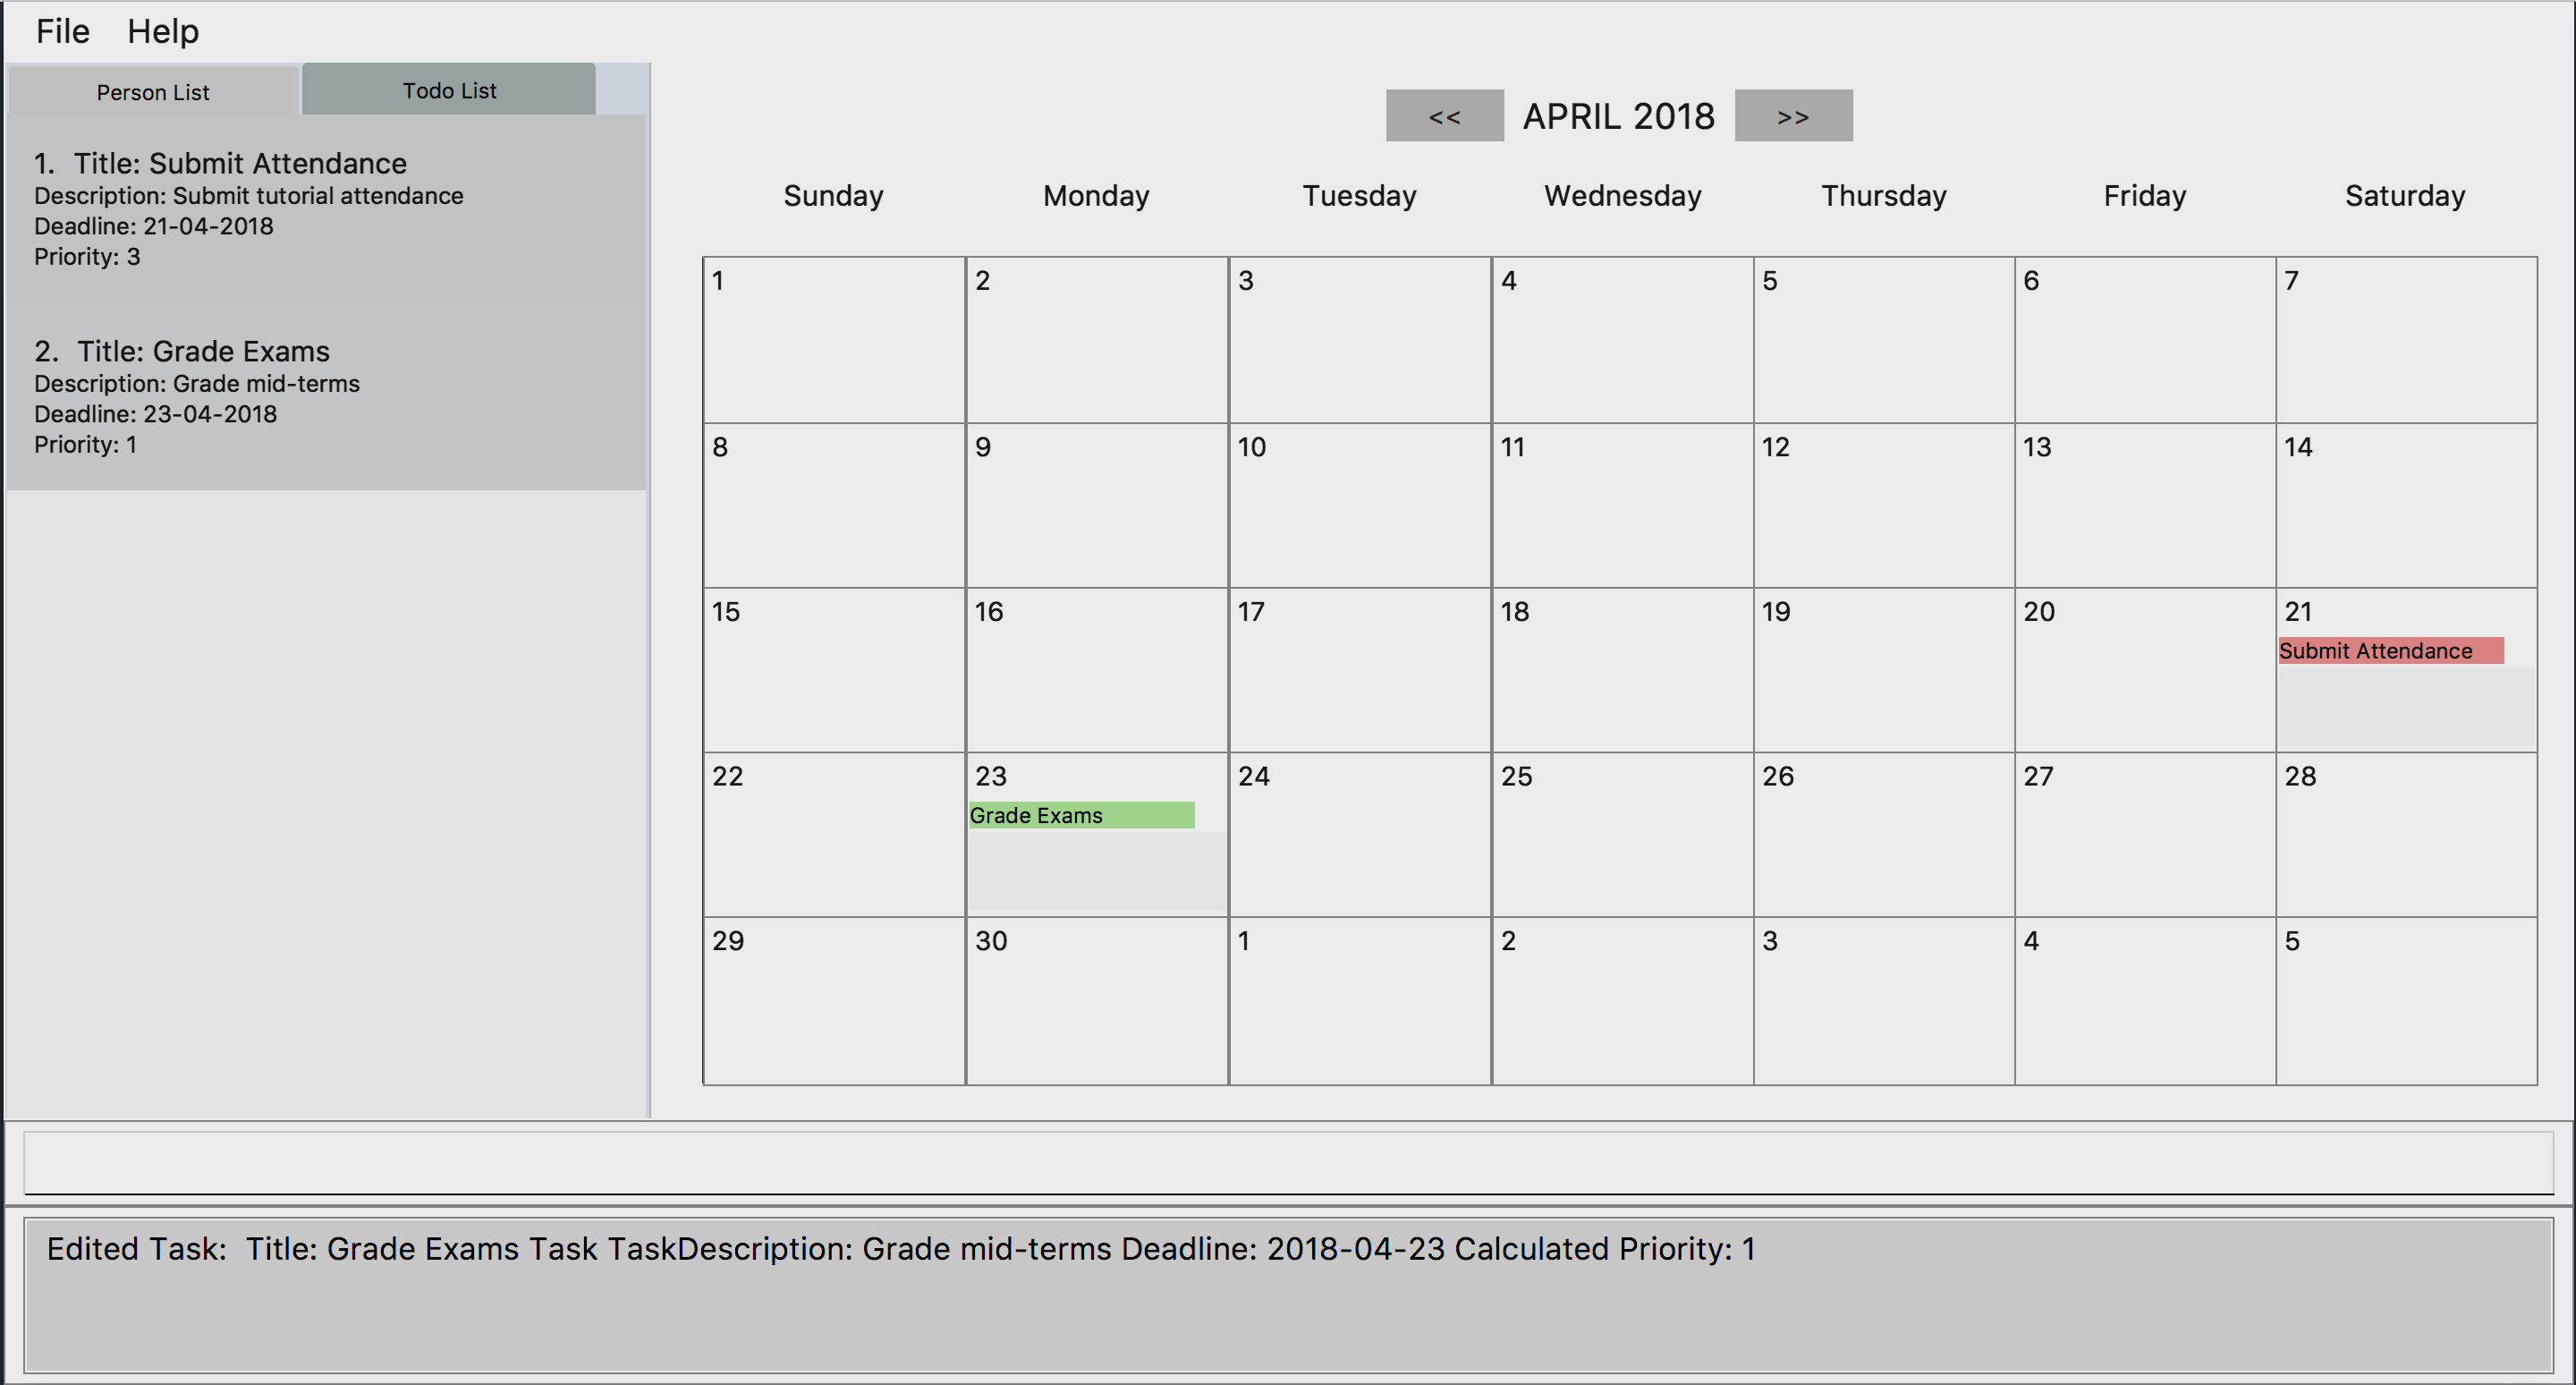
Command entered: editTask 2 by/23-04-2018
Result: This edits the task at index 2, and change its deadline to 23-04-2018 (see Figure 35).
7.4. Deleting a task: deleteTask
Deletes a task in the todo list.
Alias: dt
Format: deleteTask INDEX
The specified indexed task will be deleted from the Todo List and Calendar.
Examples:
Current date: 15-04-2018
The application initially starts with 2 tasks as seen in Figure 36 below.

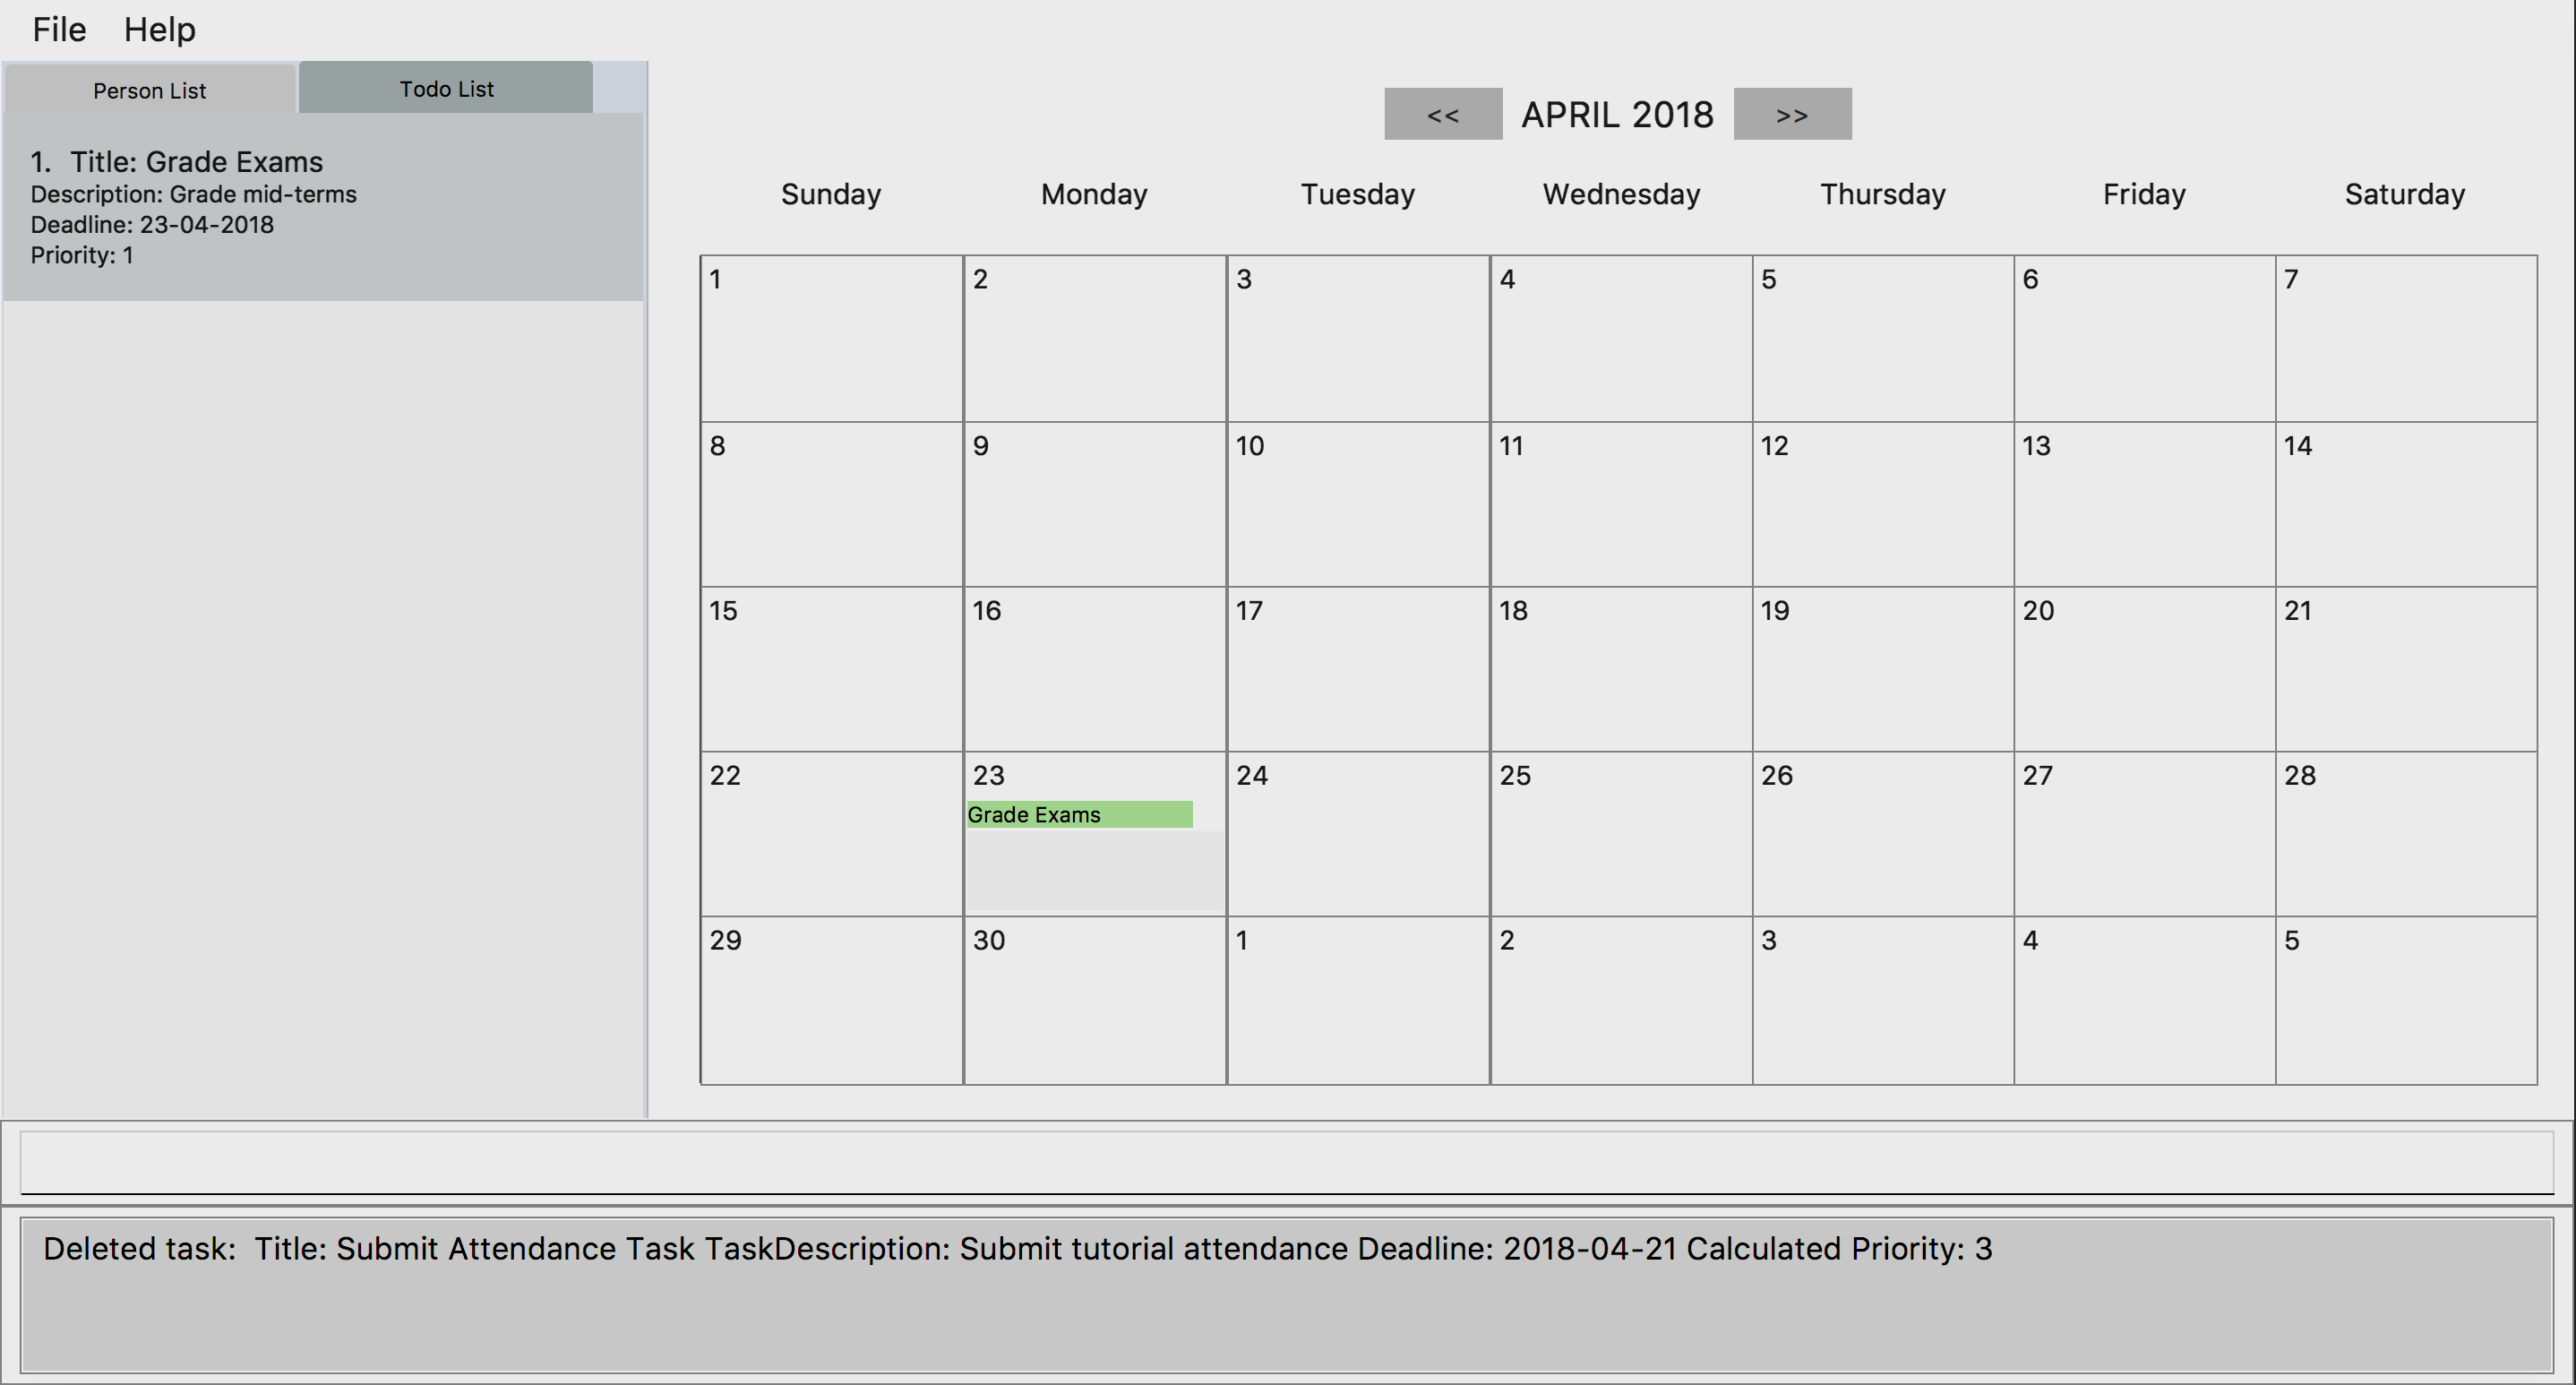
Command entered: deleteTask 1
Result: This will delete the task at index 1, as shown in Figure 37 below.
7.5. Listing all tasks: listTask
Shows a list of all tasks in application.
Alias: lt
Format: listTask
All the tasks stored in application will be listed in the Todo List.
7.6. Listing current month’s tasks: listCurrentTask
Shows a list of tasks that have their deadlines in the current month.
Alias: lct
Format: listCurrentTask
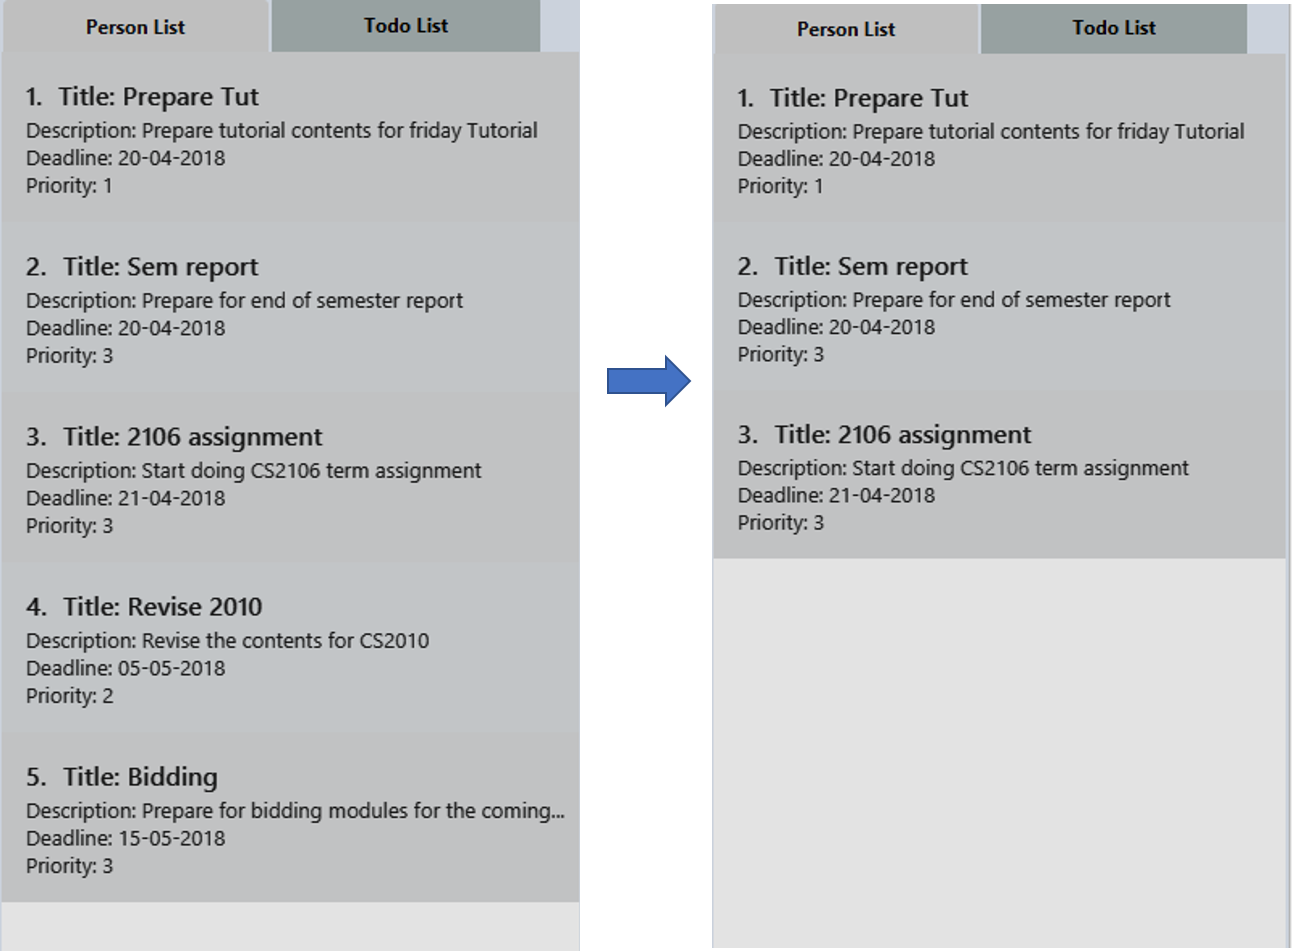
Only the tasks due within current month will be listed in the Todo List.
Figure 38 below illustrates the change in tasks displayed after listCurrentTask is entered.
7.7. Sorting tasks: sortTask
Sorts all entries displayed in Todo List in date order.
Alias: stt
Format: sortTask
8. Miscellaneous Commands
8.1. Listing entered commands: history
Lists all the commands that you have entered in reverse chronological order.
Alias: h
Format: history
|
Pressing the ↑ and ↓ arrows will display the previous and next input respectively in the command box. |
8.2. Undoing previous command: undo
Restores the address book to the state before the previous undoable command was executed.
Alias: u
Format: undo
|
Undoable commands: those that modify the application’s content (i.e. add, delete, edit, markPart, updateDP, and clear).
|
Examples:
Address book starts with the following as shown in Figure 39 below.

Command(s) entered: delete 1, list, undo
Result: The delete 1 command will be reversed.
End result should look the same as Figure 39.
Command(s) entered: select 1, list, undo
Result: The undo command fails as there are no undoable commands executed previously.
End result should look the same as Figure 39.
Command(s) entered: delete 1, clear, undo, undo
Result: Both commands reversed.
End result should look the same as Figure 39.
8.3. Redoing the previously undone command: redo
Reverses the most recent undo command.
Alias: r
Format: redo
Examples:
The application starts with the same one in Figure 39.
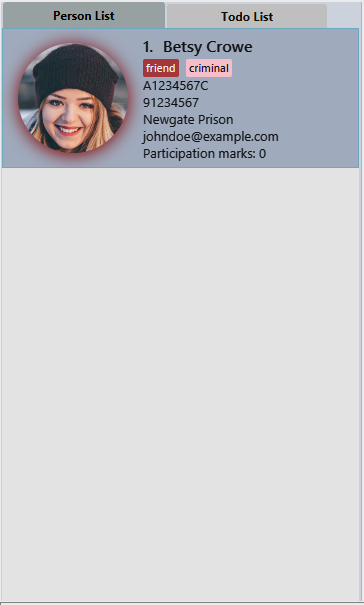
Command(s) entered: delete 1, undo, redo
Result: The delete command is reversed, then reapplied (see Figure 40).
delete Command ReappliedCommand(s) entered: delete 1, redo
Result: The redo command fails as there are no undo commands executed previously.
End result should look the same as in Figure 39.
Command(s) entered: delete 1, clear, undo, redo
Result: clear command and delete command are reversed. clear command and delete command are subsequently reapplied (see Figure 41).
8.4. Clearing all entries: clear
Clears all entries from the address book.
This command will also clear all the display picture images stored.
Alias: c
Format: clear
| This command clears ALL the data from the application (both people and tasks). The display pictures files will be cleared as well upon the next application startup. |
This is a dangerous command. If unintentionally applied, simply use the command undo to revert it. Otherwise, if application is closed without reverting, all data will be lost.
|
8.5. Importing data from another file: import
Extracts data from an xml formatted file and
replaces the current stored data.
Format: import FILEPATH
Example:
Command entered:
import ~/download/NewData.xml
9. Saving the data
Application data is saved in the hard disk automatically after any command that changes the data.
There is no need to save manually.
10. Additional Information on Features
This section provides more information on certain features of Your TA.
10.1. Add command
The add command adds a person into the application.
This command has specific compulsory (must-have) and non-compulsory fields.
Compulsory fields:
-
Name
-
Matriculation Number
-
Phone Number
-
Email Address
-
Address
Non-Compulsory fields:
-
Tags
-
Display Picture
Each individual field has a specific format requirement.
e.g the NAME field must only contain letters.
If the wrong format is detected, the application will prompt you of the correct input format in the results display panel right underneath the command input line.
10.2. Undo command
As stated in section 8.2, certain commands (not all) can be undone.
Commands that cannot be undone:
-
list -
sort -
find
10.3. Calendar
-
The calendar fills up based on the day of the first day of the month, and since the calendar only allows 35 days to be displayed, this will cause some months (e.g. September 2018) to be cut off.
-
The unfilled nodes of the calendar will be filled with the days of either the previous or next month. (Depending on the layout of the current month).
To see the last few days of the final month, click on the >> button to navigate to the next month’s calendar.The last days of that month will be displayed there, with its tasks. |
11. Frequently Asked Questions (FAQ)
Q: How do I transfer my data to another Computer?
A: Install the app in the other computer and overwrite the empty data file it creates with the data file of your previous Your TA folder.
Q: How do i keep my information safe?
A: A login feature has already been implemented as of v1.5, which ensures that a user can only access their own accounts via authentication.
12. Command Summary
12.1. Contact commands
-
Add
addn/NAMEm/MATRICULATION_NUMBER p/PHONE_NUMBERe/EMAILa/ADDRESSdp/DISPLAY_PICTURE[t/TAG]…
e.g.addn/James Hom/A2345678Jp/22224444e/jamesho@example.coma/123, Clementi Rd, 1234665t/friendt/colleague -
Clear :
clear -
Delete :
deleteINDEX
e.g.delete3 -
Edit :
editINDEX[n/NAME][m/MATRICULATION_NUMBER][p/PHONE_NUMBER][e/EMAIL][a/ADDRESS][dp/DISPLAY_PICTURE][t/TAG]…
e.g.edit2n/James Leee/jameslee@example.com -
Find :
find KEYWORD[MORE_KEYWORDS]…
e.g.find JamesJake -
List :
list -
MarkParticipation :
markPartINDEXmarks/DIGITe.gmarkPart1marks/50 -
Select :
selectINDEX
e.g.select2 -
Sort :
sort -
UpdateDP :
updateDPINDEXdp/[IMAGE PATH]
e.gupdateDP1dp/C:\Users\Betsy\Desktop\betsy.jpg
12.2. Tasks, To-do list and Calendar commands
-
Add Task :
addTaskdesc/TASK DESCRIPTIONby/DEADLINEpriority/PRIORITY
e.g.addTasktitle/Grade Examsdesc/Grade mid-termsby/04-04-2018priority/2 -
Delete Task :
deleteTaskINDEX
e.g.deleteTask1 -
Edit Task :
editTaskINDEX[title/TASK TITLE][desc/TASK DESCRIPTION][by/DEADLINE][priority/PRIORITY]e.g.editTask1title/Eat Dinner -
List Task:
listTask -
List Current month tasks:
listCurrentTask -
Sort tasks by date:
sortTask -
Switch tabs:
switchTab
12.3. Miscellaneous Commands
-
Help :
help -
History :
history -
Redo :
redo -
Undo :
undo